
For people unfamiliar with Australian geography, picture it as one little triangle in the south-east with a decent population density, and then a rapid drop-off as you leave that triangle. Up in Brisbane, at the very top of the triangle, we were often happy with 20 people at an event. But down in Canberra, I was only a few hours drive from Clash of the Champions, which at 84 people would apparently be the largest MESBG tournament Australia had ever had. Would the Witch King and Suladân continue to perform for me, or would they crumble under the pressure of 5 games against some of the best players in Australia? Read on and find out!
Tournament Format
Clash
was 600 points, with 5 randomly-drawn scenarios across two days. It soon became
extremely obvious that these scenarios were randomly drawn, because they
happened to include Storm the Camp and Heirlooms of Ages Past! No one
deliberately puts Storm the Camp in their scenario draw, surely.

There
was also a cute teams aspect to the event, which didn’t impact the rest of the
tournament at all. Team captains would decide whether to attack another team,
protect themselves, or explore the wild, and wins by their team members would
contribute to the success of the team as a whole. It also included little
minigames, including two random players being asked to guess the TO Andreas’
height (the two guesses were 1m and 2.5m, with 1m ending up the closest answer)
for a prize. It was very silly and fun, and was a great addition to an
otherwise-competitive event.
Listbuilding
For perhaps the first time in my life, I didn’t have much back and forth about what to take to a tournament. This was a big, competitive tournament, and the list that I was most likely to do well with was Witch King/Suladân. It’s just a solid list, and it’s got the tools to allow me to win almost any matchup or scenario with a little luck. Give it up one more time for…

Mordor/Serpent Horde
Warband
1
Witch King 3/10/2 on horse with Crown (Army Leader)
7 Black Númenóreans
7 Morannon Orcs with spear/shield
Orc Tracker
Warband
2
Mouth of Sauron on armoured horse
7 Black Númenóreans
7 Morannon Orcs with spear/shield
Warband
3
Suladân on armoured horse
Serpent Rider
33
models, 8 Might, 4 fast models, 1 bow
I’ve
gone over what makes this list strong many times (including these three
tournament reports (1, 2 and 3) and this explanatory article), but in short
it’s the combination of efficient models with great synergy. Every model in
this list is either a little undercosted or at least a good price, and they all
come together to be a bit more than the sum of their parts.
The
battleline is great, being able to rapidly slice through weak enemies or grind
for many turns against better troops. It’s got three F5 mounted heroes to do
some big damage when I need them to, while buffing up the troops with Harbinger
and a 6” banner. And enemy heroes hate facing double casters, so the
mere presence of the Mouth as the third hero immediately shuts down a lot of powerful
lists.
All
lists were made public in the week leading up to the event, and there were some
interesting trends. Average and median modelcounts were lower than I expected
(about 27 or so), and there were a lot of Bears, Rohan and Gondor. There
were a couple of other Witch King/Suladân lists, with both opting for Gorbag
over the Mouth (boo!). There were about 5 other Witch Kings at the event, and
mine was the only one with less than 14 Will. My advocacy for 10-Will Witch
Kings apparently has a long way to go.
Round 1 matchups were released a little before the event, and I was nervous. The first scenario was Fog of War, which tends to favour larger armies with heroes they’re happy to hide, lots of shooting, and some fast models to claim objectives. So naturally, I was facing…
Game 1: Assault on Lothlorien in Fog of War, 9:6

Not what I wanted to face in this scenario
Eric’s list had Muzgur, Druzhag, an Orc Shaman and a Goblin Captain, but the scary part of it was the 50(!) models it was bringing along. That had come at the cost of only having one Spider and one Bat, but it also meant it would be hard to get to his heroes.

To that end, I made the plan of swinging hard to
one flank to smash through it, getting my heroes into his backfield to start
killing his leaders. That also relied on rapidly taking out the Bat and Spider
to make sure there wasn’t any real threat holding back my heroes from
rampaging.

The bulk of my army goes left while a small group hold a chokepoint to protect my flank
I opted to protect Suladân on the basis that he had
Strike to fend off an Enraged Spider, and to assassinate the Goblin Captain
because there was a chance that Eric got greedy and put him into combat. My one
big mistake for the game, however, was in picking a terrain piece to capture. I
had decided I would be swinging left to smash that flank, and had separately
decided that the tree on the right flank looked like the easiest one to
capture. These two thoughts are obviously in total conflict with each other,
but that somehow didn’t click until the first turn, when it clicked hard.
This was my dumbest moment of the tournament, and I deserved to be punished for
it.

Pictured: the tree I had chosen to claim. Not pictured: enough troops to reliably do so
Instead, things actually worked out pretty well. I
lost about 5 models to shooting, but my plan of swinging left worked
spectacularly. I was able to commit the Mouth and Sully to combat in safe
positions and support them with almost my entire list, hammering into about
half of his. The Witch King’s second attempt at Sapping the Will of the Orc
Shaman also worked, shutting down Eric’s ability to reliably countercharge me.
My troops and heroes started rapidly carving through Orcs and Goblins, and
forced Eric into a desperate and ill-advised counterattack with the Bat and
Enraged Spider. The Spider lost its fight against 3 of my troops and got
wounded, before dying from the S10 Enrage hit, while Suladân Heroic Combatted
backwards to swing into the Bat Swarm after it jumped my lines to trap some
spear supports. It died instantly, leaving my heroes utterly unconstrained
by enemy threats.

The beasts are dead and my left flank is starting to crunch through
The right flank was going much worse, with my small blocking force being whittled down and overwhelmed, while my Serpent Rider botched and died instantly. As ever.

I'm badly outnumbered on this flank and it's not going well
But on the left I was able to achieve the critical breakthrough I needed, including Compelling out a Goblin to allow the Mouth to get into the Captain. 6 S4 hits later and I was up 3VPs and feeling much happier. Suladân unfortunately failed several Resist checks against Muzgur, preventing him from killing the Orc Shaman. But thankfully having killed off the Bats and Spiders meant Suladân kept his higher Fight value, and was able to fend off the swarm of Goblins enveloping him.

Suladân fights off all comers, while the Mouth rides down the Goblin Captain
Time was called and we were on our final round, and I’d noticed that Eric had failed to put any models touching the terrain piece I’d chosen. I was able to sneak one Orc through from the wreck of that flank to touch the tree, surviving the ensuing fight against an Orc and stealing a sneaky 3VPs to salvage my incredibly dumb deployment error.

There is exactly one model touching this tree, and it's mine. Phew
However, the dice
gods punished me for my sneakiness by leaving me on exactly 25 kills; one off
Breaking Eric, and thus one off getting the major win. If I’d had one more turn
I’d have been able to do so easily (and quite possibly kill Druzhag to strip 3
more points off him), but beating a 50-model list in two hours is always going
to be hard, and I don’t think either of us played especially slowly.

I just needed to force one more kill on this shattered flank and I'd have had the major! Alas
Aside from my stupid mistake at the start, I was really proud of my play this game. I think the matchup is quite rough for me in this scenario, but I identified a strategy that could give me the win and it went off flawlessly. Always a great start to a tournament!
The next game was Storm the Camp, so I was keen not
to face another of the 20 or so armies with serious shooting. So naturally, I
was up against an Avenger Bolt Thrower…
Game 2: Gondor/Rohan in Storm the Camp, 6:0
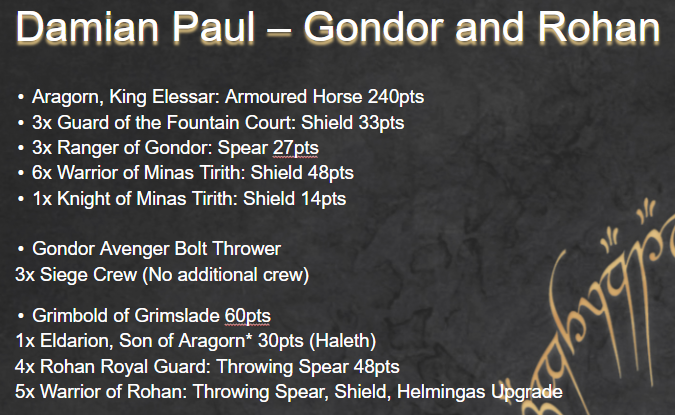
This board looked awesome, with a cool quayside
theme, some docked ships, lots of walkways over deep water and even some
cotton-fluff ‘fires’ with flickering electric candles inside them. Take a long
look at this board and appreciate how awesome it is, and then take another look
back at the scenario.

A stunning board, but a flawed one
Right. Opposite corner deployment, and half the
corners are filled with deep water. Damian and I had a good laugh about the
idea of half of one army instantly dying to swim tests turn one, before
hurriedly getting TO approval to let Damian deploy 12” from the end of the
pier. It was still a pretty rough deployment for him, but the positioning of
the Avenger on the aft of a ship and the tricky terrain around his camp also
meant I had functionally no way to ever score those points. So, standard Storm
the Camp really.

The Avenger glares ominously at me from the ship's aft as our forces try to squeeze through all the chokepoints on this map
As a result, the game ended up playing out in a
series of tight and claustrophobic duels between the houses, which rapidly
started to swing my way. Elessar had to burn all three Might to resist my first
barrage of spells and Heroic Combat through three models, but then made the
mistake of calling a Heroic Resolve. It discouraged me from casting on him that
turn, but also meant he couldn’t move, so my warriors basically just stood in
front of him and chilled for the turn. Effectively a self-Transfix in some regards!

Elessar enjoying his one heroic charge before the double-caster combo sees him stuck at exactly this spot
Elsewhere, Suladân carved a path through Damian’s left flank, and my troops spilled through to clean up the surviving warriors. Elessar was repeatedly Transfixed and basically just sat there for most of the game, while Grimbold and Haleth failed to break through my lines on the other flank. The dice definitely favoured me overall in these combats, but that was also the likely outcome; he had 240 points of Elessar standing still every turn and a 50-point Bolt Thrower menacingly glaring up at the buildings blocking its line of sight, so I was able to get a lot more hitting power into the combats than Damian could.
My one major mistake this game was creeping my
Witch King around a corner in the midgame, ready to cast on Aragorn next turn
or commit to combat if need be. On the other flank I was thinking carefully
about the Avenger’s line of sight and range, but it somehow didn’t occur to me
over on the right. Shooting came around, and a hail of bolts sliced the Witch
King’s horse out from under him. Urgh.

You can just see my (now dismounted) Witch King in the upper left, sitting safely outside the Avenger's sightlines
In the end, however, it was too little and too late. Damian’s collapsing lines couldn’t protect Aragorn’s flanks, and his Transfixed leader found himself surrounded by Suladân and about a dozen warriors. I Struck up above F6, and the King of Gondor was picked up to seal a solid 6:0 victory.
Damian was a great opponent, but honestly every
other part of this game kind of sucked. The deployment was awful, Storm the
Camp is arguably the worst scenario in the entire game, and having our whole
armies crammed into a tight street-scape on 1/3 of the board seemed a lot
cooler in theory than in practice. It also didn’t help that Elessar just hates
facing double casters, so the matchup meant he couldn’t use his fun combat hero
very much. We joked afterwards that we’d love a rematch, just in a different scenario,
on a different board, with different armies.

I can overstate neither how awesome this board looked, or how challenging it was to play on
So, having faced down 2 armies with heavy shooting
in shooting scenarios, we were now moving onto To the Death! Great. And to
round out that excitement, I was facing…
Game 3: Lothlorien/Rohan in To the Death, 2:5

I fancy my changes against this list in most scenarios, but not this one
Nilesh had a cool Rohan/Lothlorien list centred around a pike block of Galadrim Court Guards supporting Rohan Royal Guards, with Théodred and Deorwine backing them up and Haldir as the leader. That’s a list that I feel alright against in the abstract, but the terrain and scenario here rapidly reduced my options. Nilesh was able to sit Haldir and an archer up on a building to shoot down at me all game, while his other archery forced me to come to him.

I got kited for a long time as I marched forward
Once I got there, I had to fight my way through two tight chokepoints against Elves, generally with F6 pike supports, all while Haldir continued to take potshots at any hero not in combat. It was extremely rough.
The
one thing in my favour was that some early mind games had gotten into Nilesh’s
head, and he was quite concerned about what my magic could do to Théodred and
Déorwine. I’d made sure at the start that he was aware of the common Théodred
dismounting ruling (that if he could charge by dismounting but couldn’t
otherwise then he has to dismount). To avoid that risk or the risk of my magic
messing with him, Nilesh ended up keeping Théodred safely tucked behind a
building for about 5 turns. It kept him safe, but it also meant I didn’t have
to worry about him until the last couple turns.

My forces try to grind through the chokepoints, with limited success
Thankfully for Nilesh he had all the time in the world, as my list just couldn’t get anything done. I threw 5 Black Darts at Haldir, hoping to chip off a leader wound to take a minor lead in VPs. The first 4 failed to cast (with the reroll), then the 5th one rolled a 1 to wound. Awesome. My Tracker also shot at Haldir for about 7 turns, doing nothing but finally annoying him enough to take me out with one shot. In that time Haldir had dismounted all three of my heroes with his archery, and Suladân had taken two wounds trying to break through the pike block (unsuccessfully).

The smugness of this Elf was infuriating
I did manage to start overwhelming his left flank, but Déorwine was on hand to stem the bleeding and push me back.
My one ray of hope came from a misplay by Nilesh. He had left his banner out in the open touching no one, and I was eyeing it furtively and awaiting my turn. Nilesh won the next Priority and realised his mistake, protecting it again and sparking a humorous back and forth about the joys of sneaky Black Darts on exposed banners (Nilesh is also an Angmar player at heart, so he could appreciate that fine joy). On the following turn, he won Priority again and repositioned the banner once more, then forgot to move anyone into contact with it! The Game Three fatigue was clearly hitting hard. One three-dice Black Dart later and the banner was gone and I was finally up on VPs.
At this stage, however, the casualties had started to really mount. I fell back, hoping to protect my lead and not Break, but my D6 troops were falling like wheat before the scythe and I couldn’t quite prevent it.

I fall back on both fronts, but my troops can't quite stem the bleeding
In the closing turn I
went back on the offensive, trying desperately to Break Nilesh back. My troops
fought hard and did damage, but in the end I was two kills away as time was
called. More time probably wouldn’t have helped (I may well have lost Suladân
and the Witch King, to be honest), but it was a bit gut-wrenching to have come
so close and yet fallen short.

I needed three kills from this flank, but I just couldn't find them
This
was a great game, and I’m really proud of how tight I was able to make an
extremely adverse matchup. My dice felt extremely cold this game, but it’s also
hard to judge when the odds are stacked against you already; it’s always
difficult to say whether you’re getting shredded because of the dice, or
whether it’s because you’re fighting an Elf pike block in a chokepoint. Ultimately,
Nilesh did a good job of leveraging his matchup advantage to fight me in a way
that favoured him, and at that point things were always likely to go his way.

A picture of the other fight, with Theodred looming to clean it all up for Nilesh
Still,
it was a really fun game against an excellent opponent, and a great game to
close out Day 1. We headed out afterwards for drinks and dinner, before a $62
Uber got me back across the Harbour to where I was staying. Still cheaper than
a hotel, but made me wince a little.

Pictured: Jordie Moss' stunning Dwarves, which were the only army I managed to get a pic of beside the ones I played
We’ll
pause there to avoid going over three thousand words, but check back again in a
couple days’ time to see how Day 2 went. Could I come back from my
heartbreaking loss in Round 3, or was it all downhill from here?
Beautiful reports! Love the blog, thanks for the hard work.
ReplyDeleteI'm new into the game, so asking for something. Is there a way to look into the tournament lists and results? Thanks.
Thank you so much!
DeleteThere unfortunately isn't any single repository of lists or results, but different scenes tend to use different approaches. The GBHL scene in the UK (by far the biggest) makes a lot of lists and placings accessible on Longshanks, so I'd recommend looking that up. Otherwise, I believe the Atomic Cast runs through tournament winners every month or so in the UK, so that's a good place to start if you're just looking for a general sense of what is doing well.
One caveat to bear in mind with all of that: as metas evolve, what ends up doing well in a particular meta won't necessarily be great elsewhere. In the GBHL this style of WK/Suladan has been doing excellently and been very widespread, so lists like Last Alliance or Dwarves backed by Elves have been winning events because they counter WK/Suladan so well. Would those Good lists do as well elsewhere, in regions where they weren't facing so many walls of Black Numenoreans or so many F5 mounted heroes? Maybe, maybe not. So, always take tournament results with a few grains of salt.
Similarly, at Clash, the scenarios drawn happened to be very shooting-focussed. As such, shooting lists tend to really proliferate amongst the top lists (spoiler alert). Would they have done well with other random scenarios? Maybe, maybe not. It's still interesting to look at them though!
Thank you so much for the extended answer. Appreciate it a lot. Helps me see the bigger picture better.
DeleteNo worries at all, I'm always (a little too) happy to give an extended answer!
DeleteGreat summary as always - taking Druzhag in an AoL list seems like the best choice always (since you have to take him and/or Ashrak), but only having 4 beasts to super-charge seems like a bit of a missed opportunity. Lots of Orcs and not a lot of spears seemed a little odd to me too (even with the boost to shooting attack against them not coming into play from your list) . . . besides dumping all the Orcs and Goblins and going hard into spiders, what would you have changed in that list (not knowing that it was your list you'd have to fight)?
ReplyDeleteI agree with basically all of those points, and I don't think the list was entirely optimised overall. I'm okay with Orc-spam (you've got to field a lot of Orcs these days anyway, and having them in the front rank not the back does probably increase your Defence, given that the Goblins will likely have bows), but I think at least 1-2 more beasts would have made a huge difference to the list.
DeleteI think the easy first change is to swap a Prowler and the Warg Rider for another Spider, which straightaway doubles your chances at the Enraged Spider trick while retaining 49 models. I'd contemplate dropping a few Orc Warriors down to Trackers (dropping bows off their Goblin spear supports as well), which would free up some points to upgrade a few more Goblins to Prowlers or fit in a third Spider. I'd love another Bat, but at that stage you're probably down to 42 models, which is very different to the initial 50. And swapping out a few spears for shields does seem like an easy optimisation as well, the ratios are a bit off here.
Ultimately I liked that it was heavy on the numbers, so I'd try and maintain that 48-49 model level. But I think a few small tweaks would definitely make the list more well-rounded without impacting that core plan of having 50 models and terrifying shooting
Amazing report, as always. Just played against numenor following your advice and I rocked it, the mouth is such a great support hero.
ReplyDeleteThank you so much! Really glad to hear that the previous advice worked out, and that the Mouth did his job. He's a really underrated hero, absolutely love that dude
Delete