
After
an excellent Day 1, I was still undefeated, and ready to make things
happen. I had clearly been a bit too hyped up the night before and hadn’t
gotten more than a few hours of sleep, but a strong coffee and a hearty
breakfast fortified me enough for Round 4.
And mercifully, I’d worked out that I’d be facing the Kingdom of Moria in Divide and Conquer. That’s one of my better matchups, and I hoped it would start my day off well…

I
was pretty hyped about this matchup for a couple of reasons. Firstly, it’s
super thematic, with Azog continuing his mission to wipe out the people of
Durin. And second, it’s a matchup that really favours my list on paper. I’ve
got the mobility, the Might, and get to start with my whole army together and
March to the middle at double the speed of the stumpy Dwarf legs. And, of
course, Azog is absolutely terrifying for everything in a Dwarf list. Also, the
board we were playing on was a stunning Orthanc board, and it just looked
awesome.
Initially, the game played out as I expected, with my Captain Marching my whole army towards the centre while the Dwarves slogged their way forwards at 5” a turn. Matthew played it quite cleverly, recognising that a rush towards the centre would be met with a big swing into whichever group was more exposed.

Instead,
he kept at a distance, forcing me to come to him with Azog. As such, we ended
up with a clash between the King’s Champion’s warband and a somewhat-larger
Hunter Orc/Gundabad grouping, while Balin was chased down by Azog and much of
his warband.

As such, the battle rapidly became a war on two fronts. On Balin’s flank Azog chased the King of Moria round the terrain, having several turns of quite poor rolling and bouncing off a pair of Dwarves even with 8 dice to wound.

Balin did manage to get into Hunter Orcs and start chopping, but I was eventually able to run him out of Might by threatening to Combat into him, before charging in an using him as a springboard to Combat my remaining models on this flank back towards the centre.

However, it had cost me more turns and many more models
than I’d expected, with one particular Iron Guard killing a model every turn
until he was left alone to contest the nearest objective. Another Iron Guard
had also slain my Hunter Orc Captain, who hadn’t really had a great game
overall.

On
the other flank things had gone even worse, with good engages failing to
convert into kills. On the first turn of combat I actually traded evenly,
despite 4 Dwarf archers facing 4 Hunter Orcs and 2 Gundabads. The flank started
to crumble rapidly, and it looked like Matthew would be able to pour models
through to the centre.


So
we came into the first turn after we’d each Broken. I would be able to hold one
side objective and had slain Balin, while he got two models onto the other side
objective after literally every model on that flank failed their Break checks.
In the centre I just had Thrain, and his King’s Champion was narrowly within 8”
of the objective. Thrain had already justified his inclusion in my list at
deployment alone, but everything might turn on whether I got to control Thrain
this turn.
He
rolled his Courage check, and passed on doubles. It was time for Super Thrain!
I moved him into a position to block off the King’s Champion, so Matthew could
charge him but couldn’t get within 3” of the objective. The Champion went in
and called a Heroic Combat with his last Might, hoping to kill Thrain and run
onto the objective. This was definitely the right call, because Azog was
looming with three Might remaining and would clear out that objective easily if
the game went on another turn. But who was winning if the game ended this turn
would depend on whether the King’s Champion could kill Thrain.

Thrain
got the six, the Champion didn’t, and the best Dwarf on the field even managed
to wound his opponent! This meant that I was winning whether the game ended or
not, and it was all down to Thrain showing his quality.
As
it happened, the game continued for another turn, Azog killed the King’s
Champion and literally everything else on the central objective, and it ended
up a decisive 9:3 win. But the real MVP for me was absolutely Thrain.

This
game ended up being way tighter and more interesting than I’d expected, and I
think a lot of that came down to Matthew’s strategy of hanging back and letting
me come to him. It was risky, because it meant that I was holding all the
points for the entire game, but it very nearly worked. I do think that the dice
were pretty against me overall (clearly Thrain was stealing all my good luck),
and those Dwarves killed their way through my warriors much faster than they
should have/have done in past practice games against Dwarves. But definitely
kudos to my opponent for figuring out the best strategy in a tricky matchup for
him.
Unfortunately,
it looked like the favourable matchups were at an end for me. Destroy the
Supplies was next, and while that scenario is often a good one for Pits, the
Isengard list I’d be facing was looking pretty scary…
Game 5: Isengard in Destroy the Supplies, 10:0
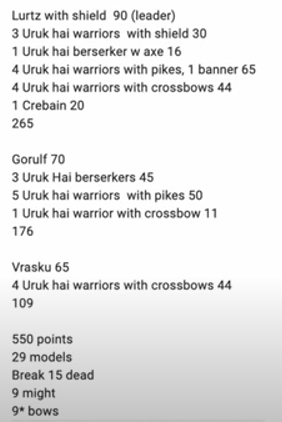
Michael’s
list was a really scary one for me in general, and especially for this
scenario. Nearly a dozen crossbow shots, backed up by lots of Berserkers and
F4/S4 Uruks, is always gonna be scary in a 24” deployment scenario. Moreover,
the lone Crebain was a big concern, as if it got loose it could gleefully flap
its way through all three of my Supplies. I’d need to play very carefully
indeed to pull this one out.
The terrain did thankfully favour me a little, with a nice solid building in a perfect staging position for Azog. I also managed to ‘lose’ Priority on the first two turns, which allowed me to respond to Michael’s early movement and position myself to strike on Turn 2.

This started with Azog pouncing on two
probably-mispositioned Uruks, threatening a Heroic Combat into Gorulf to make
him Strike and then jumping on Michael’s banner for a nice VP swing.


As
Azog started his rampage and the bulk of our armies lined up against each other
in the centre, smaller clashes were happening all across the board. On the
right flank, two Berserkers and a pike were met by 4 Hunter Orcs and a
Gundabad, while the left flank was a source of significant unease for me. Vrasku
and a buddy had run up with the Crebain along the raised platform, while I
frantically scrambled enough Hunter Orcs to try to match them. And in the
centre-left and centre-right, small gaps had developed between Michael’s flanks
and his centre. Pushing Wargs forward, I set myself up for a devastating
Surprise Attack on Turn 4.

All across the battlefield, getting to automatically move first gave me a huge advantage. Lone Wargs were able to get onto the right and centre supplies, while Hunter Orcs threw themselves in to tie up anyone who could have charged/shot at the critical Wargs.

On the far right the Berserkers and pike
were trapped by my little group, while on the left I was able to tie up Vrasku
and trap the Crebain with a Hunter Orc and Warg.

At
this stage in the game, I had distinctly put myself in a winning position: I’d
guaranteed the destruction of two Supplies, while killing Michael’s banner and
protecting my own. Azog had chopped his way through to start threatening the
Isengard heroes again, and I was quite up in the kill count. What should
probably have happened from there is Vrasku and the Crebain should have burned
one or more objectives, while we probably broke each other and I won on banner
VPs. That would have felt like a fair and well-deserved win for me, in a fairly
adverse scenario and matchup.
Instead,
what happened is that my dice told Michael to go jump off a cliff. This started
with Vrasku, who had attempted to Heroic Combat through a Hunter Orc to save
the Crebain. With two Might remaining he rolled a 4-high to my 6, and opted not
to spend his last two Might, joking that he’d need them to Might up the 2 he’d
inevitably roll on his Fate. I joked back that this was sensible because I was
about to wound him twice, and my Hunter Orc promptly rolled two 5’s to put
Vrasku in a Fate-or-die situation. Of course, this meant that Michael needed
‘anything but a 1’ on his Fate roll, and even before he rolled it we both knew
what was going to happen. Vrasku died, and we absolutely cackled.

Elsewhere my Hunter Orcs went on a tear, chopping through Uruks on every front and even bringing down the Crebain. Gorolf also lost his fight and was wounded, embarrassingly enough. This was all followed up by winning the central Move-off on the next turn, tying up all the remaining Isengard hitting power and allowing Azog to threaten a Heroic Combat into either Gorolf or Lurtz.

This
forced them both to Strike up, and naturally Gorolf promptly died to a random
Hunter Orc anyway. The last Uruk on my left flank got chopped up, while the
right was reduced to a lone Berserker. Michael was well-and-truly Broken, and
after Azog Heroic-Combatted off Lurtz it was cleanup time all round.
One
Uruk crossbow managed to protect the final Isengard Supplies from two Wargs,
but at game’s end I was sitting on an extremely unexpected 10:0 win.

This
was by far my favourite game of the tournament, for many reasons. Firstly, I
think I played an excellent game, and was really proud of putting myself in a
winning position from a matchup that looked about as bad as it gets. This was
probably my best play of the two days, and it felt good.
Secondly,
Michael was one of the most enjoyable opponents I’ve ever faced. He was that
perfect combination of competitively switched on and relaxed, and it made the
game a delight. The competitive side of things came through in all the
excellent pre-measuring and gentleman’s agreements, on everything from Feinting
to small take-backs as our tired brains fumbled through some tight positioning.
And the chill vibes were on show all throughout the game, with the wild swings
of the dice being met with nothing but laughs.
And
finally, this was the game in which everything in the list just worked. Azog
was terrifying and sliced his way through everything I pointed him at, the
Wargs snuck through to burn multiple Supplies, Hunter Orcs chopped through on
every front, and Surprise Attack flatly won me the game. The list just worked,
and it felt awesome.

After
pulling a big win out from a scary matchup, I was riding high. I’d already
achieved my goal of losing no more than one game, and I was likely to be on the
top table in the final game. Unfortunately, so was Alex Colasante and his
Corsairs-plus-Suladân list. The nightmare had finally arrived.
Game 6: Corsairs/Serpent Horde in To the Death, 1:9

I was
facing one of the best players in Australia, with the army I was most afraid of
at the event, in my worst scenario to face it. Things weren’t looking great.
The table did me some favours with lots of big Dwarf buildings to hide behind,
but I knew that things were heavily stacked against me.
In saying that, you can’t win a game that you give up on from the start, and I was determined to give the Corsairs a bloody nose before they took me down. The first few turns were quite cagey, with me hugging cover as I tried to stage forward while Alex crept forward to establish firing lanes. I was definitely grateful to be on a dense board, as a shooting gallery like my second board would have made this a total whitewash.


Eventually, I Marched with the Captain
to put Azog into range of three of his crossbows, hoping to either force them
to retreat (and sacrifice shots) or start the rampage early.
Alex instead opted to line up a bunch of crossbows and throwing daggers at those two crossbows, hoping to shoot them out of combat if I charged and maybe mow down Azog to boot. It sounds like Alex was also hoping to lure away Azog from his heroes, which was cunning.

I decided to take the bait, Marching my whole army forward as far
as it could get and charging in with Azog. This split Alex’s shooting between
my fragile Hunter Orcs and Azog with In the Ways on his own models, and in the
end neither Azog nor the models he was fighting were killed. With my army in
position to Surprise Attack in to charge next turn, I’d managed to make it into
combat with only 5-6 casualties, which was a great outcome.

Unfortunately, Azog had decided that this was his game to be a diva. Across three rounds of combat he was forced to burn 4 Might to win duels, and still lost a duel and got wounded for his troubles. I think he had only a single fight all game that he managed to win without burning any resources, which definitely stung. And his turn of failing to kill three Corsairs on the charge was frankly embarrassing.

The rest of my Hunter Orcs didn’t underperform quite that badly,
but there was still a lot of ‘I’m wounding on threes with two dice, and…
nothing.’ I also lost the two critical Heroic Move-offs, which was devastating:
both of our armies are total glass cannons so picking the fights is a huge
deal, and that’s saying nothing of the 11 throwing weapons, Backstabbers and
Reavers that Alex had, or Azog’s critical charge bonus that I missed out on.

In the
event, Alex quickly carved through my left flank while Azog was left to slowly
kill a handful of Corsairs. I was rapidly Broken but managed to pass my banner
off to one Hunter Orc after the next, before finally getting myself quartered
to deny Alex at least some VPs. That gave the Corsairs a comfortable 9:1
major win, to hand Alex the tournament!

Alex ended
up about 3-4 models away from Break, and I was a bit disappointed that I wasn’t
able to get him there. It felt like with average dice (say, winning one of the
two Move-offs and Azog getting to properly rampage) I could have picked up
those last few kills and managed to prevent Alex from wounding Azog, which
would have taken the score to a solid 6:4 loss. With some quite good dice rolls
(say, winning both Move-offs and spiking a bit in combat) then I think things
could plausibly have swung into a narrow 6:4 win, as I was actually only a
single kill behind at the end of the first turn of combat. On the other hand
though, I can hardly complain too much about my luck in light of the previous
game; on average dice I should have probably gotten a minor win and a minor
loss in the last two rounds, and the dice skewed to a major win and a major
loss instead, which would have put me in exactly the same position regardless. And
on average dice Alex definitely still smokes me (and thus wins the event), just
not by quite as much.
And more
importantly, none of this is taking anything whatsoever away from Alex’s play.
He leveraged his army’s strengths really well and punished me with them, taking
advantage of Suladân and Dalamyr’s combat punch to churn through my left while
keeping them safe from Azog on my right. I had hoped to be able to swing Azog
back over to threaten them later in the game, but Alex did an excellent job of luring
and screening him away from the critical targets. That obviously wasn’t helped
by Azog being unable to reliably beat basic warriors (or by not getting to move
first), but Alex did a great job of making it hard for him regardless. It was
really tight play all around, and he absolutely deserved the win. Even the
matchup advantage is a reflection of him having correctly assessed the
tournament pack and built for the last two scenarios in particular, which is a
key skill for any tournament player.

Alex was a
delight to play against, and the game was as enjoyable as the matchup could
have possibly been. This final win left him as the only undefeated player, for
another well-deserved tournament win (which you can watch an excellent rundown
of over on Mountain Goat Gaming; they do some great analysis, mixed in
with a little bit of classic Australian shit-talking for giggles).
Overall
that put me on three major wins, one crushing win, one draw and one major loss.
Not only did this accomplish my goal for the day of losing no more than one
game, it was good enough to secure Best Evil General (most total VPs scored)!
Amusingly, the prizes for this position included a Ruins of Dol Guldur set and
some Dol Guldur dice, which I took as a sign that the universe had dictated
that this was where I should finish. My Padlet post about the Hunter Orc
Captain shredding Raza also won me the Worthy of Remembrance price, giving me
some cool Fangorn dice and a truly cursed Gollum plushy. Definitely a great
outcome!
.jpeg)
Tournament Review
This event was absolutely awesome. It’s only
as I’m writing this that I’m realising how smoothly it was run, because on the
weekend everything just sort of… worked. The amount of effort that must have
been going on behind the scenes to have everything starting and ending on time
across 2 big days is intense, and a huge credit to Emily and Andreas that they
were able to pull it together in such a short timeframe.
The
prize support was great, the venue was really spacious and convenient, and the
terrain was excellent. The little things around the edges like the
Padlet of cool memories or the Rings of Power were really cool, and the trivia
on the Saturday night was a good way to relax after a hard day of gaming.
The
only quibbles I had were truly minor things, and often down to personal
preference. I’m not a big fan of fixed scenarios for tournaments, but these
were definitely well-chosen ones that didn’t skew too hard in any
direction (and didn’t have any of the awful scenarios in them, mercifully). And
the venue not allowing in outside food was tricky for people with dietaries,
although it was nice that you could grab a beer and drink it at your table.
Overall,
just a great event, really well run. I had 6 great games against 6 awesome
opponents, and what more can you ask of an event than that?
List review

Perfect, no notes
I’m in
love. This list is just a blast, and is so much better than it looks on paper.
It has its weaknesses, but I was able to face down 5 shooting lists across 6
games and only came unstuck in the very hardest matchup of them all.
In general,
the list does really well at both smashing people fast and grinding out the
long games. As my third and fifth games showed, it can absolutely inflict a
cataclysmic blow early and win the game off the back of that. And when that
doesn’t work, the staying power of Azog and all those A2 warriors is often able
to just keep going. In Round 1, for example, I’d lost 11 models before I’d even
killed a Haradrim, but Azog and his boys were able to grind it back and Break the
Serpent Horde in the same turn they Broke me. And messy lategames are a good
place to be with Azog, with enemies running low on resources while he’s still
Combatting for free.

As ever,
it’s good to look at the controversial aspects of the list to see how they held
up. The Hunter Orc to Gundabad ratio felt about perfect in all of my games; I
would probably have taken a couple less casualties crossing the board into the
5 gunlines I faced if I had more Gundabads, but I also would have had less
Hunter Orcs available when I got there. That’s a big downside, because a Hunter
Orc can still kill stuff while outnumbered in a way that Gundabads generally
can’t. Even in my final game, it was mostly my Hunter Orcs who took Alex to the
edge of Breaking, and I don’t think I could have relied on my Gundabads to put
me in that position. Plus, Reavers with axe weapon swaps don’t struggle to kill
Gundabads either; they’re potentially wounding D6 on 4’s! Similarly, the reason
that Round 2 ended up as a draw is that the Hunter Orcs managed to carve
through Laketown Guard once the Master’s buffs were finished; if I’d had
Gundabads then I may have been slower to Break, but I definitely wouldn’t have
Broken Riley back.

And of
course, that’s saying nothing of Round 5, where my Hunter Orcs killed two
heroes, a Crebain, and most of Michael’s list. Nor of Round 3, where Éowyn,
Gamling, and literally every warrior in Xavier’s army was dragged down by the
Hunters. When these guys get going, they give me scope to do damage so much
faster than any other army in the game. In my view it’s actually critical to
how Pits plays; if you’re wholly reliant on Azog then sometimes he will
disappoint you (see: Round 6), whereas if your warriors can get the business
done themselves then you can make things happen regardless.
Finally,
was including Thrain the right choice? Absolutely hell yeah. In Capture
and Control he gave me a big informational edge on the critical initial
deployments, and held my back objective to boot. In Fog he survived all game,
and was not a liability at all. In Command he was ready to provide a Stand Fast
to some Wargs if I Broke, and in Divide and Conquer he effectively saved me two
Might on Azog (because I only needed to March with one of my heroes not both)
and then fought off a King’s Champion to lock in a win. In Supplies he made
sure that there was never a turn where the Crebain could have gone onto my
objective, and in To the Death he… didn’t die I guess.

I don’t
think that Thrain is always the right choice for this Legion, but I really
don’t think he’s the liability that people think he is. In Fog or
Assassination, you can generally just hide him, and he can’t be targeted on the
turns that opponents get to move him out of cover. Plus, this list has the
White Warg and a Hunter Orc Captain; your opponent isn’t short of targets if
they’ve got someone like Legolas or a Witch King along! 10 points for a
deployment drop is amazing, and the extra Stand Fast can be clutch as well. No
regrets, I’m on the Thrain Train for life.
Overall, I don’t think this list was the optimal list for this tournament; that would probably have been a Corsairs list, or maybe Assault on Lothlorien. But it really outperformed expectations, and showed that it’s capable of winning into even some of its worst matchups.
Tournament Wrap-up
This was such a fun tournament, and I’m really proud of how I performed. I definitely made mistakes throughout the tournament, but I think my play was tight in every game and none of the mistakes are clear ‘if I’d done this then things would have gone better’ moments. I’m also really proud that I was able to beat 3 shooting armies with Pits and draw against a 4th, including in multiple 24” deployment missions. A lot of games came down to me knowing my army back-to-front, and that was a product of playing a lot of practice games. Game 5 in particular felt like it was decided by me really getting how my list functions in Destroy the Supplies, and how much force I needed to allocate to each of the many fronts.

More
importantly, I had an awesome time. My opponents ranged from ‘really great dude’
to ‘one of my favourite opponents ever’, and there were no bad vibes the whole
time. It was a pretty exhausting time overall, but absolutely worth it.
Massive
shoutout to Pat for hosting me, and to Emily, Andreas, Kylie and Tim for
putting on such a good show. I’m already looking forward to Masters next year!
This
weekend has really gotten me hyped for tournament play, and I’m already
planning out my next few events. There’s a cheeky 500-pointer coming up in the
same venue that I might bring my Hunter Orcs to again, and I’m contemplating
Battle Hardened in Melbourne the weekend after. Not sure I’ll be able to swing
both, but I want to make it happen. And from there we’ll be into a new edition,
and who knows what that could bring!

Comment
below your preferred Hunter Orc to Gundabad ratio, and give me all your best
stories of Thrain absolutely wrecking people (the 10-point Thrain, not the 120-point
one; that’s not as cool!).
And
until next time, may your Hunter Orcs always outfight your enemy’s heroes!
Congrats! It's sounds like it was a fun tournament.
ReplyDeleteI consider the hunter orc to be one of the best troop models in the game for it's cost. I particularly love it's option to sprinkle in 2-handed picks (incredible paired with 2 attacks IMO). I usually have ~4, and they always do work, especially cracking a trapped hero. I've noticed you've chosen to just straight weapon swap to picks instead of buying the 2-handed picks. Do you find that to be a better purchase?
I have everything for this exact army ready to go except Azog, so I think I might have to finally paint him up.
Thanks! I've actually already written up a section on two-handed weapons for Hunter Orcs for a future article, so I might just copy it in here as a sneak peak.
DeleteTwo-handed picks/axes seem useful for a list like this, because a Hunter Orc with one could hit very hard indeed. However, this is (in my view) actually a really bad faction to make use of them.
The reason why is that Hunter Orcs already have a very ‘glass cannon’ profile. When they win fights they generally kill, and when they lose they generally die. That has two effects: first, it makes offensive boosts less useful, because killing power is subject to the law of diminishing returns (you get nothing from overkilling a model you were already going to kill); and second, anything that reduces your likelihood of winning the fight is awful (because lost fights translate into lost models so rapidly).
A comparison to something like Elves (who often do two-hand) is instructive here. Elves can two-hand with the front rank and still have two unmodified dice to win the fight, thanks to a spear support and banner. Add that to their high Fight value and Defence and low Strength and you have a perfect setup for two-handing. You are decreasing your odds of winning the combat a small amount (and from a high base), and increasing your odds of Wounding a large amount (from a small base). You’re also quite resilient, so losing a few more fights isn’t the end of the world.
Hunter Orcs, on the other hand, have low Fight value and no/few spear supports, so they will generally have no unmodified dice to win the fight. Against an enemy with F4 or higher (i.e. every enemy that isn’t being run over by your horde anyway), you will need to beat their dice rolls by 2 in order to win, which is generally a very low probability. As such, you probably only two-hand when you have a buddy in the fight with you, but here we get to the critical issue: an enemy that loses a fight to two Hunter Orcs is generally dead anyway! What you really need is to increase the likelihood of getting to that stage (i.e. winning the fight) rather than improving what you’re already good at.
So, don’t field two-handed weapons. You could justify one or two, for those once-in-a-blue-moon situations where you’ve got a Shagrat or Imrahil trapped and out of Might. But in general, either a bow (if you’re not at your bow limit) or a weapon swap to an axe will be a way more reliable selection. The axe is notable because it’s great against shielding enemies (which comes up a lot), increasing your damage output without decreasing your odds of winning the fight. It's nearly as good against the trapped Imrahils, but is also relevant against all of the D5 shielding troops that fill a lot of armies (or even D5/S4 troops against whom you're willing to risk the piercing strike regardless).
I think Pits also has the added complication for the two-handed weapons that it's solving a problem (killing tough enemy heroes) that Azog already solves. The main thing I need from my Hunter Orcs against heroes is to not die, and two-handed weapons make that harder
That's pretty much my experience with the 2-handed pick; it's only used in combination with (at least) one other hunter orc to win the fight (a trap also helps). Sounds like you're using the axe in that way, but also when the hunter orc is in favourable 1v1 fights. I can see how that is useful, so maybe I'll try running a 50:50 mix and see how it goes. I play against a decent number of dwarves and D8+ models, so I think I'll keep a couple of picks for dealing with that.
Delete"Unfortunately, Azog had decided that this was his game to be a diva." Oh, if I had a dollar for the number of times I've said that about Elessar and the Balrog. :) I applaud your work and I do think the Pits is a strong list - and one that doesn't look oppressive when it sets up on the other side of the table (unlike some other lists). Perhaps it's because it leans into things the units already do natively (get lots of attacks) instead of working in a new gimmick that blunts other aspects of the game. Will be looking for a terrain review of the ruins of Dol Guldur . . . I hear those are a pain to put together. :P
ReplyDelete