Azog sniffed the air, scanning the field as he prowled atop his White Warg. Behind him marched his host, the armoured phalanxes of Gundabad flanked by the rowdy gangs of Hunter Orcs and packs of Fell Wargs. It was a fearsome force, and one that he would use to establish his dominance over the North.
His Warg’s ears suddenly pricked up, and a moment later Azog heard it too: the calls of Men and traitorous Orcs. They had come to this place as well, drawn by the call of his Master and the hope of becoming His principal servants. This could not stand.
Azog would break them, and he would bend them to his will. He would slay their leaders and cast down their banners, and all that were left would serve him as slaves. He would be the one to lead the armies of Dol Guldur, for he was Azog the Defiler.

Azog clashes with the forces of Carn Dûm
On release, I was pretty down on the Army of Carn Dûm. Their
Legendary Legion bonuses were relatively unexciting, the characters were closer
to ‘fine’ than ‘exciting’, and the basic warriors it was built around were distinctly
a point overcosted.
However, some brief listbuilding with them did seem to show
a bit more potential than I’d initially thought. They could fit in a lot of
models with the three heroes, and with a 6” banner and 6” Malbeth-aura (plus S4
across the board) it looked like there might be more potential than I’d initially
seen.
To test out this theory, I decided to put them through the
crucible of my current favourite 550-point list: the Pits of Dol Guldûr. Can
the barbarian horde overcome the power of Azog? Let’s find out!
Lists

This list does actually look pretty solid. Some decent shooting
and a few fast models back up a substantial core of angry S4 infantry. Aldrac
is a pretty scary combat threat, and Fraecht should hopefully mitigate the D5
frontline. F3 across the board is quite concerning, although at least here it
won’t hurt quite as badly as it could into the rest of the meta. The big risk
is that the list doesn’t have great options for taking on powerful enemy
heroes, which could hurt it in this matchup in particular.
Speaking of which…

This list is awesome. It’s got decent numbers, lots of Might
for March, some squirrelly Wargs for objectives, and all the hitting power in
the world. The one-two punch of Azog smashing a hole for 20 Hunter Orcs to pour
through is insane, especially when you can auto-win Priority to guarantee that
punch landing. It’s got a lot more tricks than one would first expect, and is
capable of coming from behind or brutally snowballing, depending on the
matchup. On the other hand, between the superior numbers of the Carn Dûm list
and its shooting, Pits will need to really leverage Azog to avoid being swamped
and taken apart piecemeal.
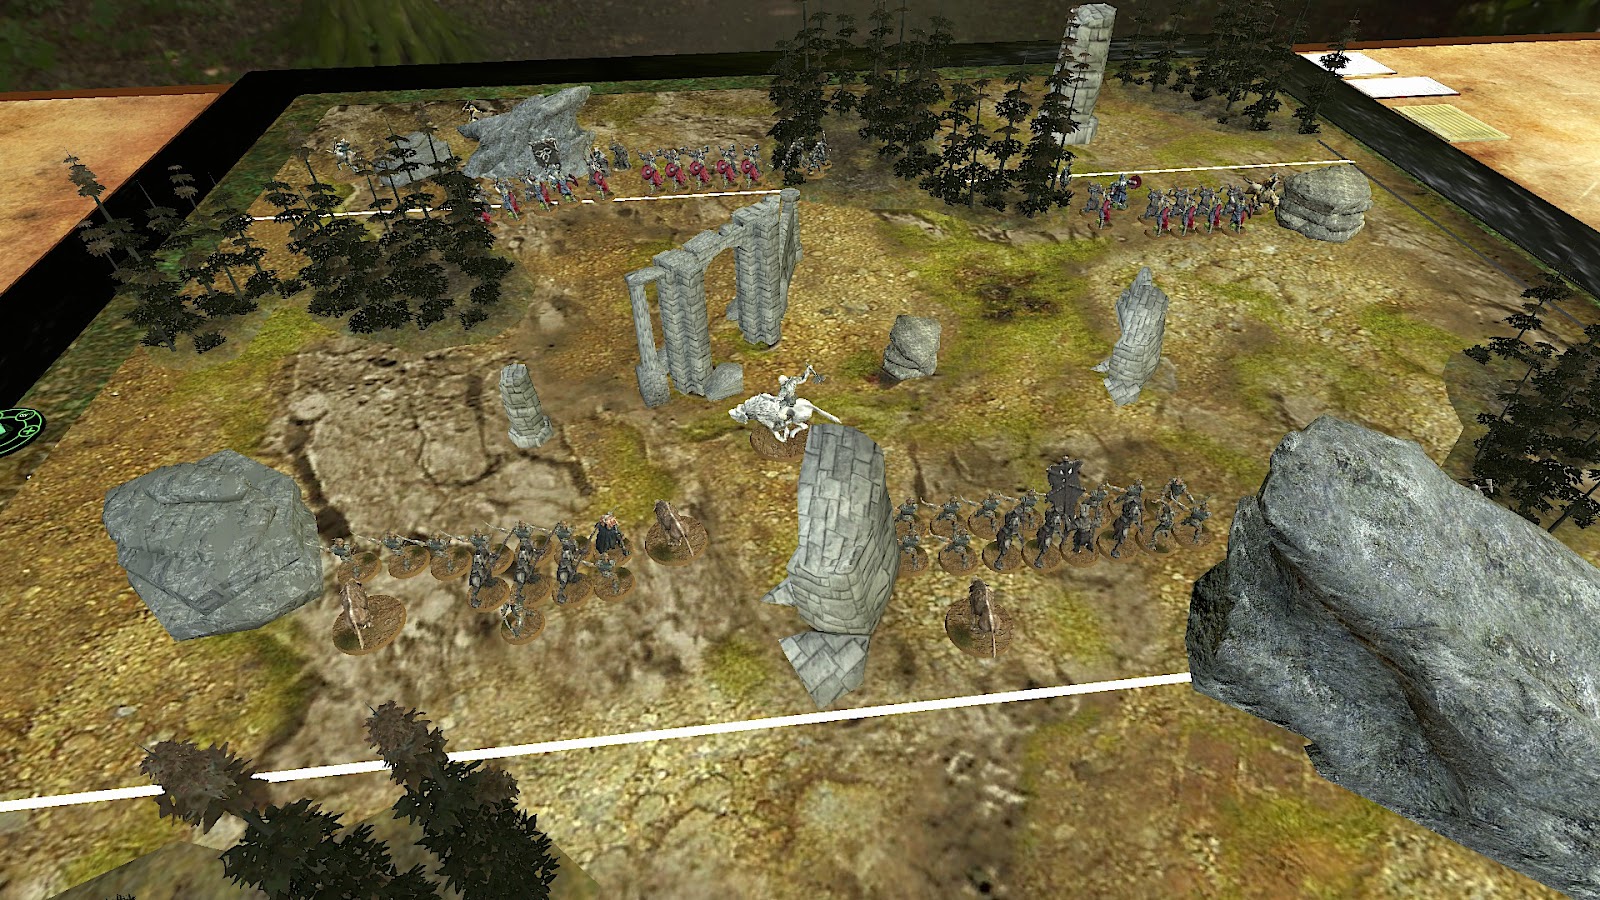
Scenario and deployment

The scenario is definitely one that favours Carn Dûm, because
those 5 Orc Trackers will get to generate plenty of value against the D4 Hunter
Orcs. Pits did manage to win the roll to pick deployment sides, however, and
took advantage by shoving Carn Dûm onto the side with a big forest down the
middle of the deployment zone. This forced the men to choose between
compressing their entire force into a smaller frontage, or splitting up one
warband. In the end they opted for the latter, hoping to either spread out the
Pits warbands to match or to sweep in behind the Hunter Orcs once the lines
were engaged.
In hindsight, this was a mistake, as we’ll come to shortly.
But for now, the armies were deployed and ready to clash!
Turns 1-3: Jockeying for position
The first two turns were relatively uneventful, with Carn
Dûm creeping forward on each flank while Pits stormed up the centre. Riding
ahead of his host was Azog, hoping to either get in early to start racking up
kills or (more likely) constrain Carn Dûm’s movement with his 10” bubble of threat.
A hail of arrows from the Orc Trackers plinked harmlessly off him thanks to his
D5.
Pits winning Priority on the second turn saw them hurtle
further forward, with Carn Dûm responding by falling back on their left flank
outside Azog’s threat range. Pits had committed a large force to this flank,
and Carn Dûm was concerned by the prospect of Azog blitzing through the Captain’s
warband and crippling it in a couple of turns before the rest of the rest of
the army could get involved. As such, Fraecht and Aldrac’s warbands stomped
steadily forward, hoping to get in range for a charge on Pits’ weak left flank.

The Trackers managed to pick off a Fell Warg, while Thrain got
confused and charged two Hunter Orcs. He managed to win his fight on a 6, then
promptly killed one of his ‘opponents’. I’d included Thrain in the list purely
for the additional deployment drop, but killing my own models starts to make it
feel less worthwhile!

The Turn 3 Priority roll was crucial, and Carn Dûm ‘won’ it.
This was a serious issue for them, because it meant that they had to commit
to a course of action and allow Pits to respond to them. If they moved up with
the Captain’s warband, then Azog would come storming in and tear it apart,
while Pits’ left flank kept their distance from the powerful Carn Dûm right. Instead,
the Carn Dûm left opted to hold position while the right pressed forward,
hoping to smash through the Hunter Orcs opposing them and get a quick lead in
the kills. That plan was helped by two Hunter Orcs being picked off by
Trackers, increasing the Carn Dûm numerical advantage to 12 models.
In return, Pits swung everything (except Thrain) hard to
their left. Azog hurtled forward to charge next turn, while behind him came the
rest of the army. The Hunter Orc Captain led his warband into the fray, setting
up favourable fights but mostly bouncing. The Captain himself spent a Might to
kill a Warrior of Carn Dûm, although this opened up a gap for Aldrac to
potentially exploit next turn. Oops.


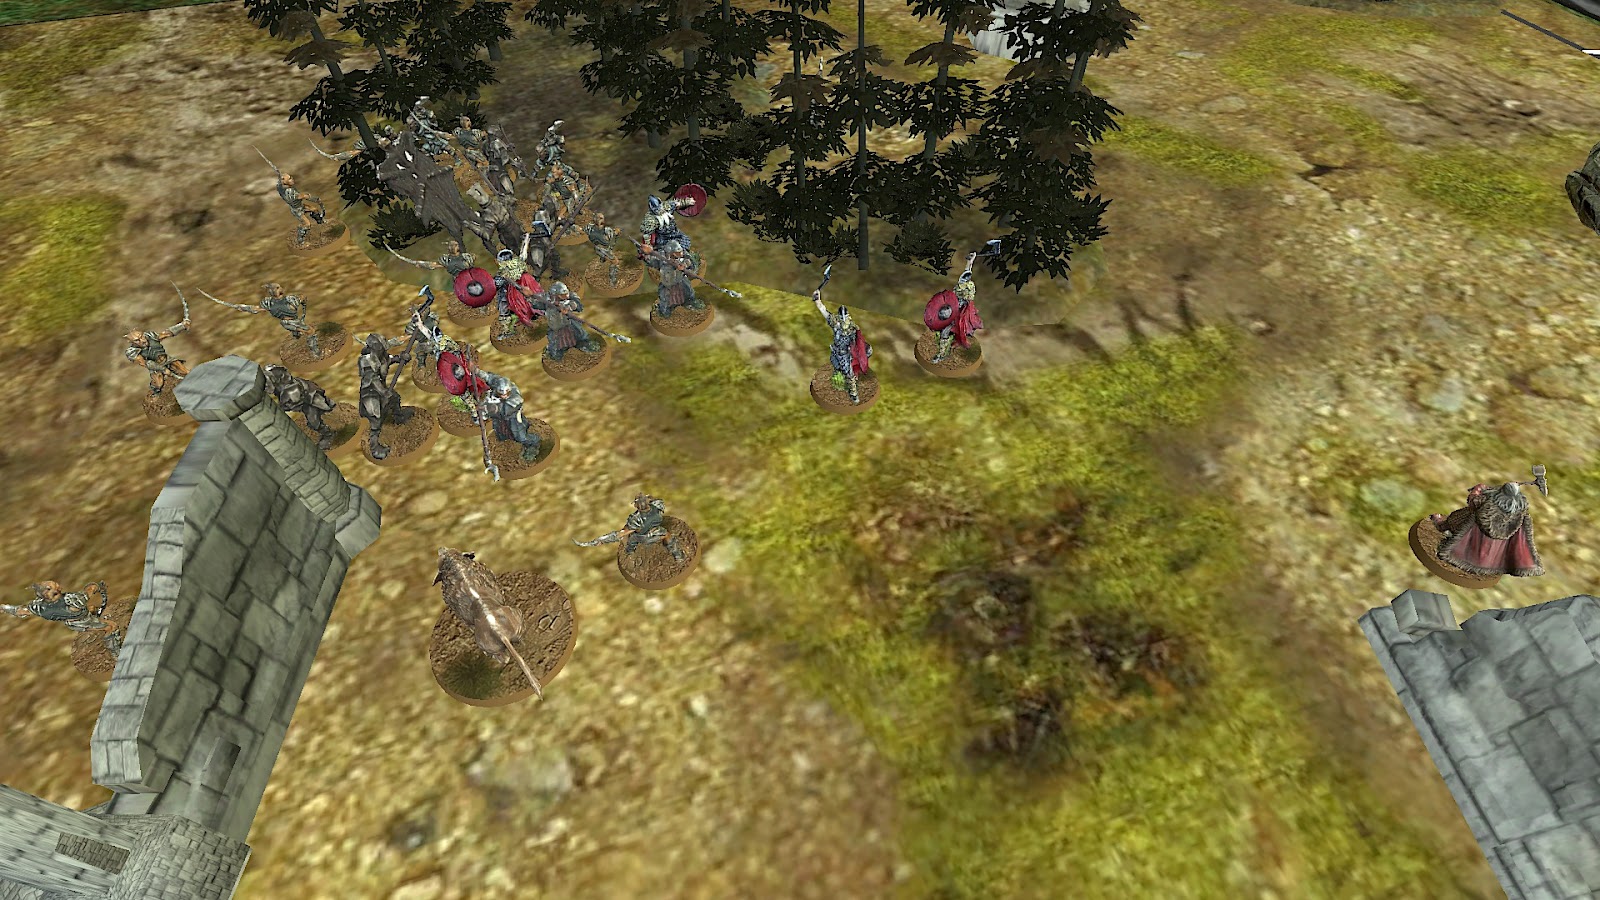
Turns 4-5: The hammer blow
Turn 4 opened with a significant Heroic Move-off, which went
Carn Dûm’s way. This allowed Aldrac to slam into the Hunter Orc Captain, who he
promptly wounded three times to kill outright. Nice! However, the rest of the Carn
Dûm right failed to live up to their leader’s heroism, killing only a single Hunter
Orc and losing three Carn Dûm Warriors and a Warg Rider (despite Fraecht’s 5+
save being active)!

Moreover, Azog had slammed into the ‘hinge’ of the Carn Dûm
line, and quickly set to work demonstrating why he’s the scariest thing in the
North. Calling his free Heroic combat, he shredded two Warriors of Carn Dûm
before taking advantage of a small positioning error to zip around the back of
the Carn Dûm line and ride down two Orc spearmen. Coupled with another Warrior of
Carn Dûm falling to two Hunter Orcs, this reduced the 8 models holding this gap
down to just 3, facing an angry tide of Hunter Orcs and Gundabads.

Even worse, Azog’s cheeky little spin had put him clear
behind the Carn Dûm battleline, with a clear path straight to Fraecht and the Carn
Dûm banner. Oh no.

Pits took full advantage by auto-winning Priority on Turn 5 with
Surprise Attack, letting Azog slam straight into the key Carn Dûm support
pieces. The casualties on the right flank last turn had also opened up gaps in
the Carn Dûm lines, and the Hunter Orcs in the Captain’s warband were able to
spill in and tie up the rest of the warriors on that flank. Aldrac was tagged
by a Gundabad, in a position where his free Heroic Combat would only let him go
into a single enemy more; and if he did so, he’d end up right in Azog’s shadow.
Scary!

The Carn Dûm Captain had called a March, and his warband
were racing round the woods to the main clash in the centre and right. However,
they were still at least a turn away from the battle, and in the meantime the
Hunter Orcs took full advantage by wiping out the Carn Dûm centre and beginning
to clear out the Trackers from the woods (although they did lose a Fell Warg
and Hunter Orc to the Trackers’ shooting and combat!).
And on the Carn Dûm right, things went even worse than I’d
expected for them. Azog gleefully butchered first Fraecht (to remove his 5+
Malbeth save) and then the banner, before riding down a stray Orc for good
measure. Aldrac initially bounced off the Gundabad he was facing, having to
spend two Might to confirm the kill and allow him his free Heroic Combat next turn.
In the meantime, he spun around the ruin, looking to put distance and models
between him and Azog while he tore into the Hunter Orc left flank.

Unfortunately for Aldrac, the warriors around him utterly
disintegrated. With their formation broken and their support pieces slain, the Carn Dûm warriors found themselves rolling less dice than the
Hunter Orcs in every fight across the line. This translated into losing 5 models
for no kills back, even without counting Azog’s devastating charge. This reduced
Carn Dûm’s right flank to Aldrac and a single Orc, and Broke them to boot!

The hammer had well-and-truly fallen, and things were looking dire for Carn Dûm.
Turns 6-7: The age of Men is over,
the time of the Orc has come

Mercifully for Carn Dûm, they won Priority on the following
turn and managed to pass Break checks for both Aldrac and the Carn Dûm Captain.
This ensured that only a lone Warg Rider ran away, and let them pick their engagements
as best as they could.
On the right, this amounted to getting Aldrac into two
Hunter Orcs and screening him off from a direct charge by Azog with the
singular Orc Warrior. Azog could still Heroic Combat into Aldrac, but at least
he wouldn’t be able to call a Heroic Strike of his own. This did mean that Aldrac
needed to burn his last Might point on a Heroic Strike, which he did reluctantly
to try to stay alive for one turn more. Azog rode down the lone Orc, before
opting to Combat into Aldrac’s fight anyway. Aldrac contemplated the heroic
choice of fighting normally and trying to one-shot Azog, but in the end decided
to shield; without any Might left, the chance of him failing to get a ‘6’ was
far too high, and if he did botch he would be instantly taken out. Aldrac
managed to Strike up above Azog and got the ‘6’ he needed, but was now out of
Might and all alone against the Pale Orc. Yikes.

Things went only slightly better for Carn Dûm in the centre,
where the Carn Dûm Captain’s warband had finally made it into combat. Several
Hunter Orcs were unable to squueze through the chokepoint to countercharge, but
those that did managed to hack down several more Warriors of Carn Dûm. A
Tracker did snipe out one last Hunter Orc though, cementing the Trackers’
status as the Carn Dûm MVPs.

Finally, on the left flank, Thrain had come wandering
forward and been charged by two Warriors of Carn Dûm. He promptly won the fight
and forced them back, ensuring that Carn Dûm had received absolutely zero bonus
from their Glory Seekers special rule. Awesome.
Evil won Priority on Turn 7, but the Carn Dûm Captain spent
his last Might point to move first and get his Stand Fast up. This kept the
majority of the Carn Dûm troops nearby in the fight, but they were now so
outnumbered that any hope of a fightback was ended. 3 more Warriors of Carn Dûm
were dragged down, quartering the army and ensuring the game would end this
turn.
A weird interaction on this flank was that Thrain had failed
his Courage test at the start of the turn and was thus being controlled by Carn Dûm.
As far as I could tell, this meant that he had to take a Break check (which he
passed), and could then call a Stand Fast to keep the nearby Warriors of Carn
Dûm in the fight. They, in turn, couldn’t charge him again, because he was
currently a friendly model for them. Weird!

Finally, on the right flank, Aldrac was alone and Mightless against Azog and his buddies. This went exactly how you might have expected, with Azog effortlessly riding down the Carn Dûm leader to seal a massive 12:0 victory for the Pits of Dol Guldur!

Strategy review
Ouch! This game looked tight right up until Turn 5, where
Pits stepped on the gas and killed 12 Carn Dûm models (including Fraecht and
the banner) for only three losses back. In truth, however, I think this
devastation was a likely product of four critical moments earlier in the game.

First, Carn Dûm deploying the Captain’s warband on the left
side of the forest was a huge mistake. The smart move was to put him inside the
forest, which would have been awkward but would have shaved at least a turn off
his troops getting into the fray.
Second, losing Priority on Turn 3 meant that Pits had the
information they needed to answer the key strategic question of the game: whether
to commit their forces to the Carn Dûm right or left. If this Priority had gone
the other way then things could have been very different, as it would have been
Carn Dûm with the informational advantage on the most important turn of the
battle.

Third, the combats on Turn 4 needed to go much better for Carn
Dûm. This was the single turn in which the Carn Dûm right had the advantage
over the Pits left, and they botched it. Aldrac obviously did his part by
killing the Hunter Orc Captain, but his buddies were unable to give him the
support he needed and folded far too quickly. This meant that when Pits
auto-won Priority on the next turn, they were able to force one-on-one or
better fights all across that flank. And when an Orc Warrior or Warrior of Carn
Dûm is all alone against an angry Hunter Orc, that fight tends to go badly very
quickly.

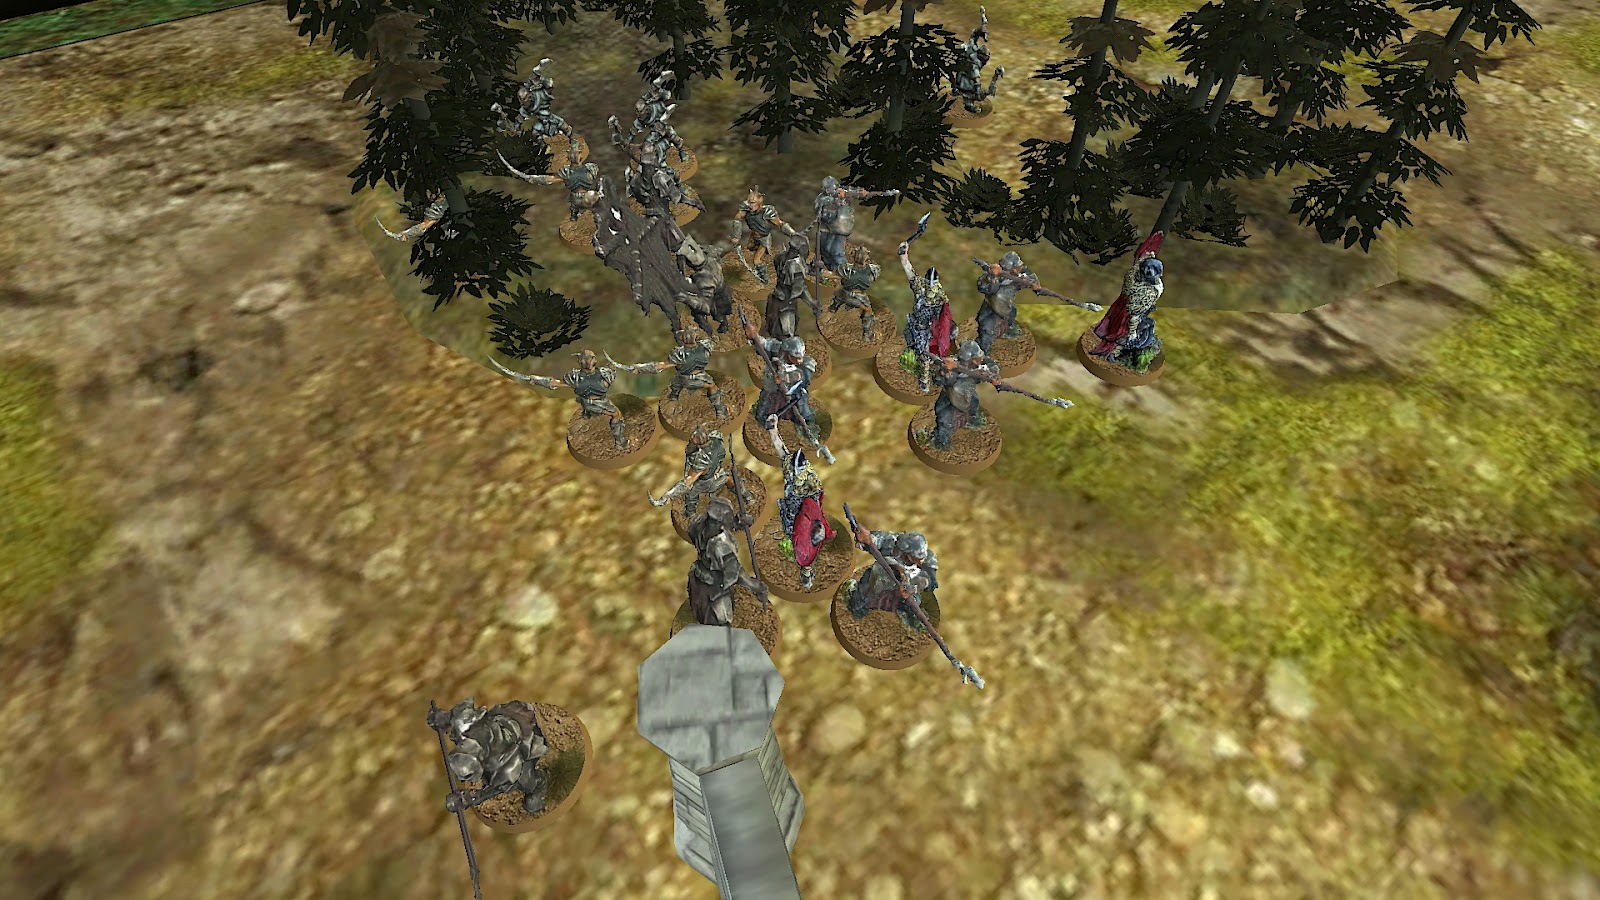
And fourth, the Orc Warrior at the bottom-left of the above picture needed to be just a little bit to the left. This would have forced Azog
to Heroic Combat into this Orc and the Warrior of Carn Dûm above them, instead
of spinning around to the second Orc Warrior. In turn, that would have meant
that Azog might not have been able to go directly into Fraecht and the banner on
the next turn, ensuring that at least one of them would have survived to
continue providing their crucial buffing auras to the Carn Dûm right flank. What
a big difference such a tiny positioning error made!

Once those four factors were in place, the slaughter of Turn
5 was always likely. And from that point on the outcome was never really in
doubt, as Pits was holding all the cards: a numerical advantage, superior
positioning, better troops and the power of a full-Might Azog.
Army reviews
Not much to say about the Pits list; it performed in classic
Pits fashion, by using Azog to bust a hole and take out critical pieces before
swarming everything within reach with Hunter Orcs. Simple, predictable, and
utterly devastating. I need to remember to keep Thrain out of charge distance
of my Hunter Orcs, but aside from that it really put in the work.
I have less pleasant things to say about the Army of Carn
Dûm, unfortunately.
Starting with the good stuff, the Trackers felt great! They
killed about 6 Hunter Orcs and Wargs between them, which is an amazing effort
for 25 points of archers. If I was to run this list again, I’d definitely swap
out a Warrior of Carn Dûm and an Orc for three more Trackers.
Aldrac also seemed solid, and I got the sense that he could
be really excellent in the right build. One-shotting the Hunter Orc Captain (in
fact killing him twice over thanks to Mighty Blow!) was awesome, and I could
see him Heroic Combatting through the lines to kill a critical enemy piece in
certain matchups. Not being mounted holds him back a lot, but he seemed worthwhile
overall.
And finally, the 6” banner buff was great. It definitely
helped hold the Carn Dûm lines together in the initial clashes on Turn 3 and 4,
before Azog unceremoniously rode it down.

Unfortunately, the rest of the list was deeply
disappointing. The battleline really didn’t feel great, and while its numbers
were solid they didn’t feel high enough to justify how weak the warriors felt.
A F3/D5/S4 battleline is fine, but it means you’re starting from behind against
a huge swathe of lists. Any F4 line (almost all of them these days) is going to
have a big edge, and the D5 basically cancels out the S4 because it means that
both sides are likely wounding each other on 5’s. All of which would be fine if
these warriors weren’t the same cost as a Black Númenórean! The only thing the
warriors have going for them over other mid-range infantry is the Glory Seekers
special rule, which is going to be useless in almost every matchup. F3 warriors
are not generally a huge threat to enemy heroes, especially when you’re
fielding them without any magical support!
And speaking of magical support, and thus of Fraecht, he was actually worse than I’d
expected. While obviously its not his fault that he got assassinated by Azog,
the lack of Heroic Defence (found on many comparable models) meant that he had
no way to stall for a turn once he had gotten caught out of position. His buffs
requiring Will points (and needing to be declared at the very start of the
turn) meant that he had to try and pick whether it was going to be worthwhile
in advance. This meant that the defensive buff wasn’t up on Turn 3, because it
didn’t seem worth spending the Might for. Moreover, it failed to even save
anyone on Turn 4 when it was affecting a heap of fights. Malbeth’s aura is so
busted because the models it’s saving are themselves quite resilient, so that
you’re generally only doing a single wound to them when you win the fight
(giving him a good chance to save a model). With D5, however, it’s much more
likely that the warriors suffer multiple wounds in a turn, which is always
going to be hard for Fraecht to save.

Overall, you can basically consider his buff to be equivalent
to +1D on the frontline models. It’s not an exact analogy (the buff is better
against S4 and worse against S3), but it’s about right. So, with that in mind,
and given that his profile is otherwise probably worth about 25-30 points,
would you spend 35-40 points to make your frontline D6 for 4 specific turns
(assuming that he doesn’t get assassinated, Sap Willed, or otherwise inconvenienced)?
It’s not a great trade.
And finally, for one final dunk on the Legion: +1 Fight
value on the turn after you kill a hero is so useless. Aldrac is the only model
in the list with any hero-killing abilities, and the circumstances in which
Aldrac will kill a hero and then immediately need F6 on the next turn seem very
rare. That ability could have stacked, or been an aura of +1 Fight for all
nearby troops, and it would have been entirely fine. It’s frustratingly
conservative design for a potentially very interesting ability.

In sum then, I wasn’t impressed by the Army of Carn Dûm. Hopefully next edition they get the buffs they need to live up to their potential.

With one final spring of his Warg, Azog bore down on his
prey and struck. The blow was well-aimed, and the human leader was smashed to
the ground where he lay still. Turning away from his kill, the Pale Orc surveyed
the battlefield. Everywhere the Men and their Orc allies were laying down their
arms or being hacked down by his warriors. Victory was his.
Spurring his Warg to spring atop an outcropping, Azog
roared to his host:
‘To Dol Guldur!’
I hope you enjoyed this battle report, with all the
strategic and army-balance musings afterwards. If you’ve had experiences playing
with or against the new Carn Dûm (especially when seeded into a vanilla Angmar
list) I’d love to hear them.
And until next time, may your positioning always be as perfect as it needs to!
Can't believe GW made the terrible profile that Fräecht is. And the warrior profile is 1 pts too expensive. Carn Dum was never intended to be competitive for some reason. Hope its better in the next edition.
ReplyDeleteYeah, it is weird how underpowered they made them all. I get that any profile can be made busted in Angmar, but it's not like you can combo them with the old Shade or anything. Just weird
DeleteI admire your commitment to actually testing these lists that the pundits in the community think are trash.
ReplyDeleteDid the army of Carn Dûm just feel like a sub-par Army of Dunland?
Thank you! I think it ended up playing fairly differently to Dunland: it has cheap spears but no F4, but it's only got a single combat hero, it's more reliant on Fraecht's buffs in one specific area, it's got better shooting and worse mobility (no Crebain), and it doesn't get the once-per-game big damage boost that can just cripple an enemy list. So, lots of differences, but probably worse overall
DeleteJust an FYI, with the carn dum legion, you get +1 fight on your heroes when you kill an enemy model, not when you kill a hero.
ReplyDeleteIt's a shame that carn dum didn't too well, the models are amazing and the lore is really cool. I'm still going to build a force of them hoping they are better in the new edition.
Do they? I've heard mixed things on that so far, but my book hasn't arrived yet for me to confirm it. I guess that's a marginal improvement if so, but it's still pretty weak when it's only affecting Aldrac and maybe the Captain in a small way.
DeleteThe nice thing about a new edition is everything's on the table for potential improvements!
I love your blog. However it seems azog was given free white warg for this game ;) (at least it doesnt appear in the army list while the model and the 10 inch bubble sugest he actually had his warg)
ReplyDeleteThankfully just me forgetting to click the White Warg button on Tabletop Admiral, not a misplay; both armies were 550 points, so it was all fair and balanced
Delete