
Over the last few weeks I’ve been frantically fitting in as many games with the new Vanquishers Legion as possible. This is partly because they’re new and interesting, partly because I plan on taking them to a tournament soon and partly just that they are incredibly exciting to play. Genuinely, if you haven’t gotten the message from my last few posts: give these guys a go, they’re absolutely wild.
Since my last battle report I’ve played a relatively unexciting game against Ugluk’s Scouts, in which the Vanquishers moved up to hold the central objective in Divide and Conquer, then quartered the Uruk force at breakneck pace while using magic to blast anyone standing on the other two objectives.

Out of all the armies the Vanquishers had faced so far, none
had had anything truly big. They’d killed Aragorn easily enough, and
Azog had been put down without much exertion, but I was thinking something
bigger. Enter, the Balrog.
Depths of Moria Legendary Legion
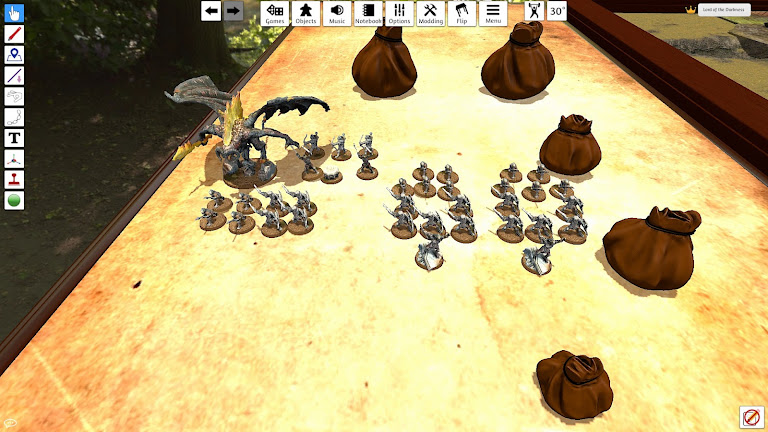
Warband 1
The Balrog (Army Leader)
Goblin Drum
11 Goblins (4 spears, 4 shields, 3 bows)
Warband 2
Goblin Captain
10 Goblins (5 shields, 5 spears)
Warband 3
Goblin Captain
10 Goblins (5 shields, 5 spears)
36 models, 4 Might, 3 bows, no fast models.
This is probably the standard way to build this Legion for
650: the Balrog, a Drum, a couple Captains then as many Goblins as you can fit.
It’s not particularly subtle, and I haven’t had uniformly good experiences with
it at this points level, but it’s still got a lot of power. And the Balrog is
about as close to an unstoppable force as this game has.
Vanquishers of the Necromancer Legendary Legion

Warband 1
Saruman the White (Army Leader)
Galadriel, Lady of Light
Radagast the Brown
Elrond, Master of Rivendell with heavy armour
4 models, 12 Might, no fast models, no bows.
This will be the list I take to my next tournament, so no
tweaks. I’ll probably try out Gandalf instead of Radagast soon, but I just know
I’ll miss his healing and Nature’s Wrath so much. At any rate, it’s a nasty,
nasty little list, way more so than it looks; check out my last two battle
reports for some examples of what it can do.
As a matchup, Evil has some big advantages here. The Balrog
is more than a match for any of the Good heroes, even if they can use Heroic
Defence to hold it up a little while. Goblins that auto-pass Courage tests and
get banner rerolls are also a huge annoyance to the White Council, and they
outnumber their foe 9:1. Good does still have an enormous Might and magic
advantage however, and even the Balrog is likely to start failing Resist tests
when it’s facing 3-4 spells per turn.
Scenario
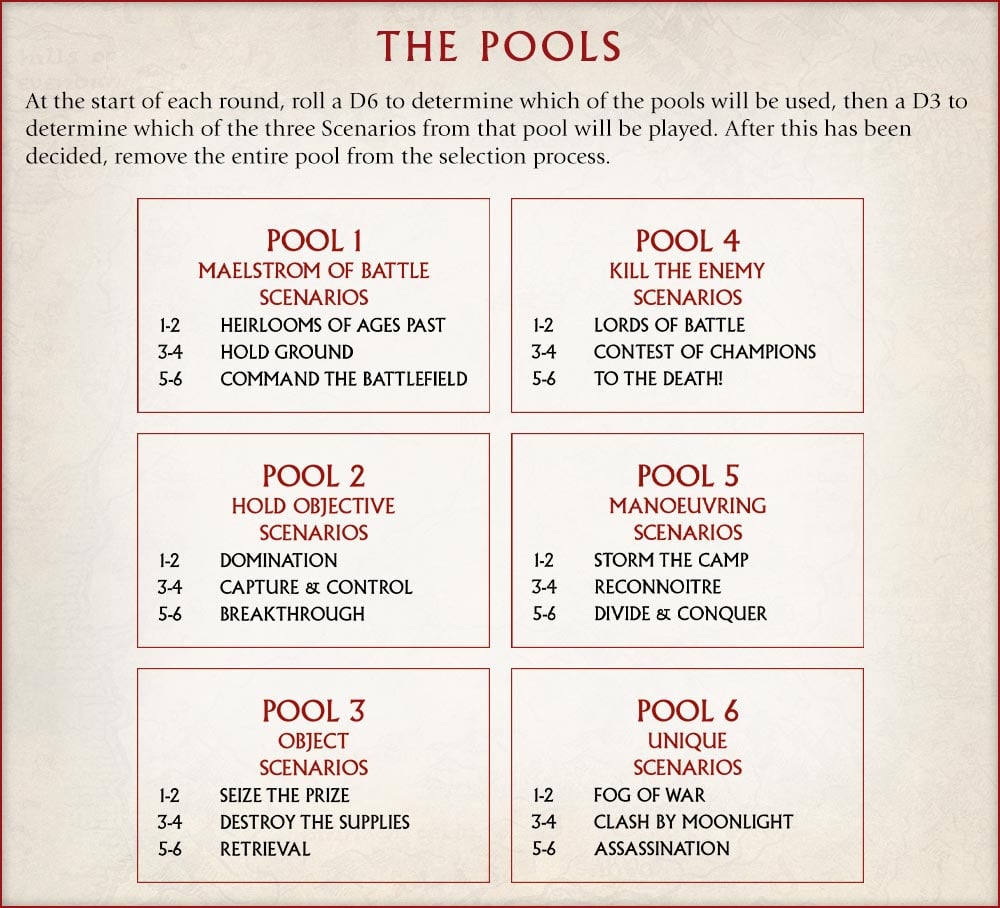
Today I was picking from Pool 1, with Evil immediately
vetoing Heirlooms because it was the only scenario that didn’t depend on
outnumbering the enemy within a specific area. Good then picked Hold Ground,
because it was at least better to try and hold the middle of the battlefield
than all the quarters away from it. They also had a sneaky plan to not
initially reduce the Balrog beneath six Wounds. If they could do that then they
would avoid Breaking the Moria force, allowing them to wipe out the Goblins at
their leisure (well, aside from the fiery demon breathing down their neck), not
needing to worry about the game ending.
Deployment

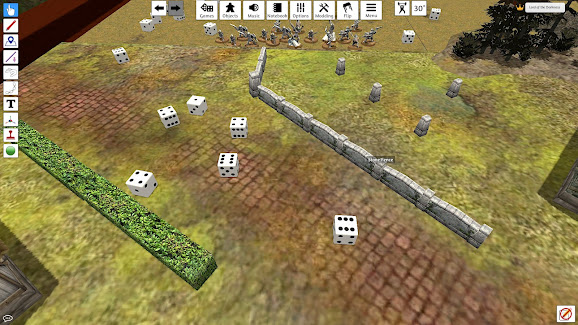
The board was a pretty standard competitive setup, with some
houses and trees but lots of open space. No one deployed, instead moving on
turn 1.
Turn 1: Where is Everyone?

On turn 1, Evil ‘won’ Priority and moved the Balrog’s
warband on in the centre of the north edge. Then both Captains failed to arrive
and so did the Vanquishers, who decided they didn’t want to spend Might to get
placed next to the Balrog!
Turns 2-5: Ambush and Pursuit
Good managed to lose Priority again, with one Goblin warband
arriving behind the Balrog and the other being placed over in the far corner.
Then the Vanquishers showed up behind them, Wounding the Captain with a
Banishment, knocking down some Goblins with Sorcerous Blast and having
Radagast’s Nature’s Wrath Resisted.

Turn 3 started with a Heroic Move-off, Radagast losing to the Captain who ran for the centre with his warband. The other Goblins either followed him or tried to tie up the Vanquishers, although Galadriel Banished the one that had charged Radagast and Elrond to allow them to keep them moving forward. Saruman killed a Goblin with Sorcerous Blast, then Radagast fluffed his Wrath roll.


On Turns 4 and 5, the Goblins in the west continued to try and escape after Evil won Priority again, although the Good heroes were able to keep blasting them with magic and getting into combat with their slower opponents. The Goblin Captain’s Heroic Moves to stay ahead of them eventually ended on Turn 5, when Galadriel Banished the Goblin screening him and smashed him to pieces. The Balrog was starting to loom though, so the real fight was about to begin.

Turn 6: Go Back to The Darkness!
Evil was down to a couple of Goblins from the west warband, while their horde had enveloped the central objective. The Balrog was nearly alone against the Council, hoping to block them from ignoring it and wiping out his Goblins. Good started their turn by Banishing one Goblin and charging another with Galadriel, before Radagast succeeded in knocking down the Balrog with Nature’s Wrath after it failed to get the ‘6’ it needed. Radagast, Saruman and Elrond then piled into the demon, deciding to take advantage of the opportunity to potentially chip a few Wounds off it.


Turn 7: Stay Down!

Good decided to expend their single Foresight point on
winning Priority this round, using it to Immobilise the Balrog and keep it on
the ground while the four heroes piled into the last two Goblins from the
western warband. Radagast knocked them down just for overkill’s sake, and that
was that.
Turns 8-9: The Swarm Descends

Good won Priority, charging Galadriel into the second
Captain while blasting it with Banishment. Radagast and Saruman both attempted
to Immobilise the Balrog to keep it from standing up, but good Resist rolls
allowed it to begin stalking over. In return, the Goblins swarmed the heroes,
managing to knock some Fate off Saruman after he botched his rolls before
Galadriel obliterated the Captain after spending Might on her duel rolls.

On turn 9 Radagast called a Heroic Move to make sure that
the Balrog couldn’t charge anyone this turn. Again it shrugged off both
Immobilise attempts, before moving close to Saruman and setting him on fire,
Wounding him once with the S9 hit and then again with the S5 hit in the End
Phase. Elsewhere the Goblins continued to pile into combat, with Saruman facing
8 enemies with only two Attacks. Thankfully everyone managed to pull through
and win their combats, smashing down a handful of Goblins for no reply.
Turns 10-11: Desperate Times

Elrond declared a Heroic Move this turn, managing to knock
down the Balrog with Wrath of Bruinen before charging in to keep it pinned.
Galadriel managed to Banish a key Goblin, allowing Saruman to stop, drop and
roll to extinguish his flames. By my reading of the rules he could stand up
again after crawling for 1”, but I may have misread this and it didn’t really
matter anyway (Edit: I’ve now realised why this wasn’t legal, as a model cannot
both lie down and stand up in a turn. Saruman won his fight and failed to Wound
anyone this turn anyway, so he’d have just stood up in the Fight phase).
Finally Radagast failed to heal Saruman with his special ability, cast Renew to
heal him anyway then charged into two prone Goblins and killed them both.
However, things went downhill in combat as Elrond lost his fight to the Balrog,
allowing it to get back on its feet. More concerningly, Galadriel was defeated
by the Goblins she was facing and Wounded 5 times, needing to spend Might to
pass her third Fate roll and survive. In the north, the Goblin archers that had
been guarding the Drum began to run towards the centre to contribute their
numbers. With the Balrog about to pounce and several heroes badly Wounded,
things were looking bleak for the Vanquishers.
Good Priority in Turn 11 allowed Radagast to heal (via Renew and his special rule) Wounds on both Saruman and Galadriel, but a combo of Wrath of Bruinen and Immobilise were both Resisted by the Balrog (which was now out of Will). In return it piled into Elrond, ready to slaughter him and roll onwards, while the Goblins continued to swarm the other three heroes. Elrond contemplated calling a Heroic Defence before realising that he was facing so many foes that he’d quite possibly die anyway. So instead he called a Strike, hitting F10 and rolling a ‘6’ on his duel rolls. As it happened, the Balrog and 4 Goblins (with a Drum reroll!) failed to roll a single ‘6’, allowing Elrond to scythe down three Goblins and Break the Evil force.


Turns 12-13: The Final Moments
Good lost Priority this turn, but a Heroic Move from Galadriel allowed her to Banish a Goblin while Radagast cast Nature’s Wrath and knocked down the Balrog for Elrond to pin it again.


On the final turn Evil retained Priority, with the lone Drummer in the north continuing to stick around and play his drum.


Radagast then lost his combat against the Goblin he was facing, although Elrond and Galadriel effortlessly slew their opponent. Saruman even managed to beat back the Balrog, making all of the effort to Immobilise it feel a little wasted.


Strategy Review
Both sides’ basic strategies were fundamentally sound, I
think. Good’s plan to neutralise the Balrog with magic while slaughtering the
Goblins was distinctly their most reliable way to get enough numbers in the
middle when the game ended. Similarly, the Evil plan to throw the Balrog into Good’s
path was a good counter to that, even if it did end up pinned down and out of
the fight for a couple of turns.
Good’s biggest mistake was a failure to be thorough in the first combat against the Balrog. Elrond should have rolled his dice to Wound last and kept his reroll handy instead of just rolling it as an extra dice to Wound. If I’d done that I would have been able to reroll one of my successes to inflict only 4 Wounds on the Balrog so the Goblins wouldn’t have Broken. I managed to kill enough Goblins on the turn they were Broken for it not to really matter, but that would have been a safer option.

For Evil, the only awful call was forgetting about the archers on the north flank. They normally tend to be best just sitting around to support the Drum, but I really should have brought them in to the middle a couple of turns earlier. I’m not used to thinking about Breaking with this army, but I really needed to get those three models into the Balrog’s Fearless aura before they had to start passing Break tests. That would have also meant a few more models in the middle, letting me potentially flip the scoring on a couple of turns the game could have ended.

Army Reviews
Depths of Moria is a powerful Legion, and this matchup
really did show off a lot of what it can do. 35 Goblins felt like a lot
here in a way that they don’t against more conventional lists, and the combo of
the Drum and Fearless for the Goblins makes them an absolute pain to deal with.
And the Balrog makes for a great centrepiece model, as it really does feel
unstoppable at points.
In saying that, it was distinctly stopped here. It
failed to kill a single model, and the closest it got to doing so was when it
set Saruman on fire after he lost his Fate points to Goblins. It Resisted a lot
of spells, but it still got knocked down and/or Immobilised more turns than
not. In fact, it only had a single turn when it was in combat and able to make
Strikes, and it didn’t even roll a ‘6’ on its duel roll to take advantage of
that! This is probably a pretty bad matchup for the Balrog itself, but it still
feels pretty bad to kill nothing with a 350-point monster. And while the
Goblins put up a remarkably solid fight and felt like they could have ground
down the Good heroes if they had a couple dozen more models, Goblins are always
going to struggle to overcome a quartet of powerful heroes without support.

This was what I’d call an actively hostile matchup for the Vanquishers: facing a centrepiece model that’s as close to immune to magic as you can get while vastly outnumbered by a Fearless horde with banner rerolls. And the scenario— cunning tricks around not Breaking the enemy aside— is a really difficult one for them. While it at least allows them all to stick together, the win condition is model count in an area, which is pretty rough. The Vanquishers took this hostile matchup and smashed it wide open, killing almost every Goblin on the field and badly wounding the Balrog. In fact, if the fight had gone on another couple of turns I would have been very confident in their capacity to bring the demon down.

In particular, this scenario really showed (again) how
unstoppable that magical bombardment is. a monster with 10 Will and Resistant
to Magic still had its defences overwhelmed and was Immobilised/ knocked prone
more turns than not. If I had been trying to kill the Balrog, then
Galadriel would probably have taken it down with Banishment well before the
game ended. I really don’t think that there is any matchup, except possibly the
mirror, in which you can rely on a single model holding out against these
spellcasters. You might be able to do enough damage fast enough that it doesn’t
matter, but those spells will be getting through eventually.
Having said all of that, this game did also show how annoying Fearless troops are to this Legion when they’re present en masse. Getting Trapped every single turn was what nearly did in for Galadriel, and it definitely exposed how much they rely on that constant stream of failed Courage checks to stop the enemy overwhelming them.


I hope you enjoyed my third battle report with the new Vanquishers Legendary Legion! I’m loving how these guys play, so keep your eyes peeled for more articles on both using and defeating them.

Until then, I’d love to hear what matchups you think these
guys would struggle with. Do you think a hero-heavy list would ramp up the
pressure fast enough to get some kills? What about a pure, Fearless horde?
Maybe an Isengard Demolition Team? I’d love to hear your thoughts.
May the game always end on a turn that you’re ahead!
Great batrep, the amount of control you have is terrifying, as is how quickly the Vanquishers took down the Balrog. I'm excited to see what you do with the list.
ReplyDeleteOne question though, you said you were thinking of running Radagast instead of Gandalf. Am I misremembering or is Gandalf mandatory for the LL? I could've sworn they added that in one of the FAQs.
Glad you enjoyed! This Legion was definitely a terrifying force back in the day, and probably still is.
DeleteRe your question, you're absolutely right that the FAQ changed that. I mentioned this in the intro, but I actually played and wrote up this game way back when the Legion came out, and never got around to posting it till yesterday. So there are actually a few things going on here that aren't quite legal anymore, but they were fine at the time of writing!
Thanks for writing this up - it's a cool list (even if it does need to take Gandalf now). I'm actually keen to try it out at 500pts with the mandatory models, since they can all skirmish from a distance (Sorcerous Blast or Banishment), and I hopefully won't have to kill too many models to break someone with that kind of list. :)
Delete