
With all the excitement of the new Legendary Legions being released, I though I’d test out my two favourites in battle against each other. In the interests of an objective comparison I played both sides, on the assumption that I was about equally good with either army. Also, I was desperate to play and couldn't find anyone last minute! The battle was a 650-point one, as that seemed like a level at which both Legions could pull together solid lists without running out of efficient purchases. Read on to hear how they went!
Vanquishers of the Necromancer Legendary Legion

Warband 1
Saruman the White (Army Leader)
Galadriel, Lady of Light
Radagast the Brown
Elrond, Master of Rivendell with heavy armour
4 models, 12 Might, no fast models, no bows.
This Legion seems to basically build itself at points above
500, with a clear worst hero (Gandalf) and very limited options. At 650 I could
afford 4 models but no sleigh, so in went everyone except the Grey Pilgrim
(he’s obviously unconscious by this point) to kick some Dol Guldur butt. It’s a
deceptive looking list, with a surprising amount of combat punch and resilience
to complement its vast magical arsenal. It definitely feels like the underdog
against the sheer muscle of its opponent though.
Pits of Dol Guldur Legendary Legion

Warband 1
Azog on White Warg (Army Leader)
5 Gundabad Orcs with spear and shield
Gundabad Orc with spear, shield and banner
5 Hunter Orcs (2 bows)
Fell Warg
Warband 2
Keeper of the Dungeons
4 Gundabad Orcs with spear and shield
5 Hunter Orcs (2 bows)
Fell Warg
Warband 1
Hunter Orc Captain (represented here by Narzug)
3 Gundabad Orcs with spear and shield
4 Hunter Orcs (3 bows)
Fell Warg
36 models, 11 Might, 4 fast models, 7 bows.
This list looks a lot more conventional, and is certainly
more well-rounded. It’s got a big core of S4 infantry, some with two Attacks
and some with D6 and spears. Supporting that are a handful of Fell Wargs to
capture objectives, and two decent fighters in the Keeper and Hunter Orc
Captain. Heading it all up is Azog, who brings an enormous amount of combat
power that can keep rolling every turn with free Heroic Combats. The Legion
also brings Resistant to Magic, which could be clutch here, as well as the
ability to automatically move first on one critical turn. That could be game
winning if timed right, but the Vanquishers’ capacity to cast after being
charged could see it backfire. Still, this Legion has the numbers to grind out
a long game, and the brutal strength of Azog to make it a very short one if he
wins a few combats.
Scenario
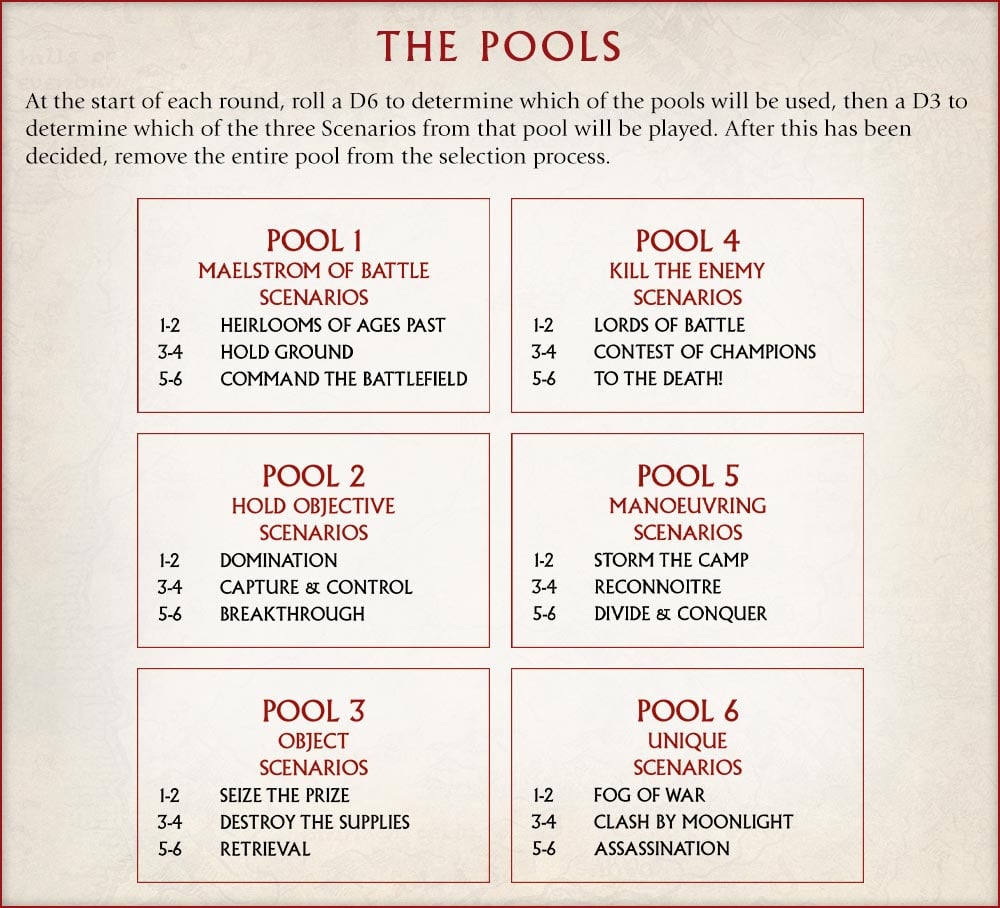
As is standard Down Under, I chose scenarios using a veto
system. A dice roll told me I was using Pool 6, which contains Fog of War,
Clash by Moonlight and Assassination. Evil immediately vetoed Assassination,
because Galadriel could basically auto-snipe a hero with her super-Banishment
to win that mission turn one. Good then picked Fog of War, reasoning it would
incentivise them using magic to kill Evil’s minor heroes (already the plan) and
Clash by Moonlight would only benefit those 7 bows Evil had along.
Deployment and Secret Objectives
While I forgot to take any pictures of this, the two sides
basically deployed on either side of a hill with a Rohan hamlet on top. Evil
opted to target Galadriel, seeing as she was the most fragile member and the
one most likely to exhaust herself with magic, while keeping back the Hunter
Orc Captain to protect. Finally, they picked a patch of long grass way in the
NW corner as their terrain piece to claim.
Good decided to target the Keeper, reasoning that his Strike
would likely see him thrown into combat at some point, while protecting Elrond
because the Elf is one of the toughest heroes to kill in the whole game.
Finally, they picked an overhung bit of building in the centre, hoping to hold
it and keep back the tides of Orcs.
Turns 1-3: A Nearly-Panicked Steed
Both sides moved up slowly towards the middle, neither in
any great hurry to come into the other’s threat range. On turn 1, Radagast and
Saruman both cast Channelled Terrifying Aura to try and mitigate the Evil
warrior models, although Radagast failed to cast (with a reroll!) and had to
spend a point of Might to lock it in. What a great start.

Things picked up from there, as Azog had chosen to hide
himself behind the central building to threaten an unexpected charge. However,
Radagast’s ability to target models he can’t see allowed him to cast Panic
Steed on turn 1 and 2, rolling high both times on two dice with a reroll and forcing Azog to expend
a massive 4 Might and two Will to retain his steed, even with Resistant to
Magic! In hindsight, Azog maybe should have just accepted the White Warg’s
loss, but I was particularly leery of Panic Steed as it would cause the White
Warg (quite a powerful combat model and one that automatically passed Courage
tests) to disappear from the battlefield. And once it left I would be losing its 3 Might anyway, so I was really only spending one Might extra to prevent that. Otherwise on turn two and three the
Vanquishers stayed out of charge range, picking off a Hunter Orc with Sorcerous
Blast. Two Banishments and another Blast were shrugged off by the Orcs thanks
to Resistant to Magic, which was already proving its value. Finally, in Evil
turn 3 Azog raced around the corner and close to the White Council, hoping to
smash into them next turn. His minions spilled around behind him, or outflanked
the Council from either side of the central hamlet, while the Keeper and Captain
kept their distance on either flank.
Turns 4-5: The Pale Orc Falls

On the next turn, both sides were well and truly in charge
distance, but Azog opted not to call a Surprise Attack to guarantee moving
first. With the Terror of the Vanquishers and their capacity to cast after
being charged, moving first seemed no guarantee of good matchups. Good then
managed to win Priority, charging Saruman, Galadriel and Elrond into combat with
Azog, while Radagast attempted to cover their left flank to prevent Saruman or
Elrond being peeled off. On the way in they unleashed a devastating magical
barrage, with Radagast forcing Azog to spend another Will and Might to Resist
Panic Steed, while Saruman managed to roll a ‘6’ on Sorcerous Blast. Maxing out at a 5 on his Resist rolls, Azog
then had to choose between retaining his last Might point to Strike, but being
dismounted and maybe Wounded, or burning Might to at least not be prone. In the end he went with the latter, staying mounted
but out of Might. Finally, Galadriel managed to smite him with Banishment,
forcing him to burn both Fate points to stave it off. In return, a brave pair
of Hunter Orcs managed to pass their Terror tests to peel off Radagast and
Saruman, but the Orcs on the other side froze in Terror at the sight of
Galadriel’s War Aspect. However, this meant little in the end, as while Good
won the fight by burning Might on a Duel roll (8 dice with no sixes!), they
managed to utterly botch the Wound rolls and bounced off the unarmoured Orc (7 dice with no fives!).
Elsewhere, Radagast smashed down a Hunter Orc with ease, relishing his newfound 3
Attacks.

Turn 5, and Azog again opted not to call a Surprise Attack.
Being able to peel off foes after they’d moved and cast was the only thing that
kept him alive last round, and he wanted the option again this time. So Good
piled everyone except Galadriel into him, again unleashing a terrifying
volley of spells. Radagast at last dismounted Azog with Panic Steed, the White Warg
disappearing into the fields, while Saruman used Command to draw the
Hunter Orc Captain into range before smashing it back again with a Sorcerous
Blast and spending a Might to lock in the Wound. Elrond attempted to cast a
Wrath of Bruinen but failed the roll, and Galadriel’s Banishment was Resisted
by Azog. In the Evil Move Phase (it certainly took a long time to do the Good
Move Phase, despite only having four models!) the Orcs swung into combat,
peeling off Radagast and Saruman with some lucky Courage tests. However, I
abruptly realised that in doing so, I’d made a big mistake, in that I couldn’t
peel off Elrond anymore to stop him calling a Heroic Strike. I flung in a
Hunter Orc with spear support anyway, but the Elf was determined not to make last
turn’s mistake again. Hitting F10 with his Strike, he easily won the combat
before executing the Pale Orc, spending a Might point to inflict the
third Wound and secure the kill. Elsewhere, Radagast, Saruman and Galadriel all
killed their foes, cementing an awful turn for Evil.

Turns 6-8: Wrath of the Council

The following turn went little better, with Good winning
Priority again thanks to Elrond’s Foresight before devastating the Evil lines
with Nature’s Wrath. Galadriel managed to work her way through a gap in control
zones to Banish the Keeper, Wounding him once after he botched his Resist rolls
(on three dice!). Saruman continued to bombard the Hunter Orc Captain with
spells, but the Orc’s Resist rolls were everything the Keeper’s weren’t and he
was able to move out of range of Sorcerous Blast. Evil poured in Orcs in
their Move Phase, but Terror and Nature's Wrath hamstrung them, and by the
end of the turn another pile of Evil models had been removed. On the plus side, the
Feral Wargs had at least managed to secure several different terrain features
in the Good half, keeping the Vanquishers guessing as to which one was the
objective.

Good burned yet more Foresight points (they’d started with a lucky ‘6’) to retain Priority in turn 7, and Galadriel was able to poke her head just far enough around the building to Banish the Keeper. A calamitous failure to roll above a ‘2’ saw the Orc slain, with three Might yet unspent!

Elsewhere Radagast
and Elrond failed to knock down the Orcs and were swamped in turn, with the Elf
needing to spend Might to win his fight and slay two Hunter Orcs. Saruman
managed to Command the Hunter Orc Captain closer again, but lacked the range to
Sorcerous Blast him into oblivion. Realising the desperate nature of their
situation, the Orcs charged in almost solely against Galadriel, aiming to drag
down at least one Council member for some VPs. However, she easily rolled a ‘6’
on her 4 dice, killing a Hunter Orc to clear a path between the two buildings
towards Good’s objective. Elsewhere Saruman and Radagast continued to cleave their way through the Orcs, with Evil getting scarily close to Breaking and Good’s
heroes still unharmed.

Turn 8 saw Evil finally win Priority, swarming the Good
heroes. Terror continued to hold them back, however, and all of the Good heroes
ended up in some quite achievable combats. Things got much more achievable, of
course, once Radagast unleashed a massive Nature’s Wrath to knockdown most of
the Evil army, and the resultant slaughter saw Evil reduced to 18 models, one
off Breaking. The one bright point was that the Hunter Orc Captain was at last
more than 18” from Saruman, and the White Wizard failed his casting roll to
Sorcerous Blast some poor Hunter Orcs instead.

Turns 9-10: Endgame
On turn 10 Evil won Priority again, but as their numbers
began to dwindle so too did their ability to take enough Terror tests to get
models into combat. Thankfully Good had an off turn with spellcasting, with the
only successes being Galadriel Banishing a Fell Warg that had gotten too close
and Saruman Blasting a Hunter Orc to Break the Evil force. Evil at least
managed to win a combat against Elrond, but the resilient Elf was able to
shelter behind his armour to survive the hail of blows. Elsewhere Radagast
continued to hunt the Orc Banner, killing its fourth carrier in close combat
before watching as another Orc picked it up.
Turn 11 proved to be the final turn, with Good winning
Priority and racing Galadriel and Radagast onto their objective terrain piece
while Saruman and Elrond prepared to fend off the Orc attack. They needn’t have
bothered, as the Orcs fled in droves from the victorious Vanquishers, and those
Orcs who did pass Break tests failed their Terror checks. Off on the Evil
objective, the Hunter Orc Captain burned his last Might to stick around, but it
was by far too little, too late.

Evil was quartered and the game ended, scoring 1 point for protecting the Captain from (too much) harm, and 3 more for securing their secret objective.

However, Good had achieved a mighty 12 points for killing the
Keeper, keeping Elrond unhurt, claiming their own objective and Breaking the
Evil force, for a decisive 12:4 victory for the Vanquishers of the Necromancer!

Strategy Review
This game had a few key mistakes in it. Evil forgetting
about Radagast’s ability to ignore line of sight (I genuinely did forget until
it was Radagast’s turn to move) meant Azog took a turn more of magical
bombardment than he needed to. More fundamentally, Azog should probably have just
dismounted off the White Warg on turn 1. It would have reduced his potential
hitting power, but he was never realistically going to keep his mount once the
spells started flying, and at least then it wouldn’t have automatically fled. It
would have also meant he could have laughed off Radagast’s spells, as he
wouldn’t have needed to protect his mount. The choice not to call a Surprise
Attack on turns 4 or 5 was also a mistake in hindsight, but the strategy of
peeling off Good models with Orcs was a good one, and it would have worked a
lot less well going first. The bigger error was peeling off Saruman in turn 5,
as it let Elrond get into Azog and decapitate him. Really though, it was only
luck that saw him survive 7 Strikes from Galadriel and Elrond in the previous
round, and it was probably a matter of time once he was dismounted. For Good, things
obviously went quite well, aside from a few fumbles as the casters got in each
other’s way. I can’t be too harsh on them though, given that the White Council
ended the game completely unharmed!

Legendary Legion Review
Honestly, both Legions showed their worth here. The Pits
might have gotten absolutely eviscerated, but that would have happened even
faster without Resistant to Magic. Azog would have appreciated Master of Battle
in this matchup, as free Heroic Combats only really served to prevent Good
using Heroic Combats to pile into his fight. But without Resistant to Magic,
the Pale Orc would have been helpless against Good’s magical barrage. The rest
of the army was solid, but did show the Legion’s obvious weakpoint in that they
struggled to crack the tough Good models once Azog was down.
Speaking of Azog going down, wow. That Vanquishers spam of
sorcerous powers was terrifying, and it only took them two turns to totally
burn through the resources of a 6 Might, 4 Will hero with Resistant to Magic. Really, all I can say is wow. Once Azog was down, these guys were free to rampage absolutely unchecked,
with Terror holding back most enemies, 3 Attacks and a banner reroll on
everyone slaughtering those who did get in, and that relentless rain of spells hammering
down any big threats. They clearly have little to fear from chip damage,
especially with Radagast being able to heal multiple models a turn. The
struggle with facing these guys (at least when you can’t just swarm the
objectives) will be getting your heroes into position to ride down the more
fragile models like Galadriel without losing them to the rain of spells. I
could see a potential weakness here to Elven lists with lots of F5/6 and
Elven-made weapons, as they could at least win a lot of combats. But how one
translates those combats into dead heroes without Radagast or Elrond healing
them back up seems a real struggle. They’ve still only got four models for
objectives, but as was shown here, four models is plenty enough to claim an
objective if you slaughter everything that was standing on it first.
In summary, watch out for these guys, because they feel
very, very strong.

I hope you enjoyed this battle report filled with the very
cutting edge of list design. Let me know your experiences with these Legions below, or which ones you’re excited to try first!
Until next time, may your Resistant to Magic die always roll
sixes!
Wow nice rapport 👍🏻.
ReplyDeleteBut the FAQ for MESBG :
Q: If Azog is riding the White Warg and is affected by the Panic
Steed Magical Power, will the White Warg remain on the board
thanks to its Raging Beast special rule? (p.95)
A: Yes.
Yeah, that got pointed out on Facebook. Definitely one to remember for next time it comes up.
DeleteGlad you enjoyed!
This comment has been removed by the author.
DeleteThis comment has been removed by the author.
ReplyDeleteHave a good vs evil event coming up this weekend. I know at least 1 player will bring vanquishers at 700 points. Any tips for me as the evil player? Thanks!
ReplyDeleteThere's definitely a few things you can do to tilt the odds in your favour.
DeleteYour plan basically has to shift entirely on whether or not its an objective scenario.
If it's not, then you need to win the game in the first two turns of combat. After that point you'll likely be out of Will and slowly ground down while they Nature's Wrath you to death, at which point it's game over. So go hard early with every tool you have and try and kill at least one in the first turn of combat. That's obviously not easy for most lists, but it's basically just what you have to do.
On the other hand, if there are objectives to play with then life is much easier. Your plan is basically to keep your Army Leader safe to preserve those points (hide them as far away as possible, the Vanquishers have a huge threat range) while getting slowly whittled down until the game ends with you holding more objectives than your opponent. Kite them, don't engage too much, then swarm the objectives on the final two turns. If you have some other threatening models that aren't your Army Leader, it still probably makes sense to commit them early to try and force a kill or at least keep them under pressure, but you honestly still might be better off keeping them back to pounce on any Vanquishers that spread out too much. The key with these scenarios is to accept they're probably going to Break you, and aim to just win the game on objectives anyway.
Hope that helps!